GPS Drawing

Last year, after I started geotagging my photos, I did a few visual art projects combining photography and GPS technology. I am fascinated by maps, how we imagine the world around us, how we communicated that world to others, etc.

A GPS receiver (including many smartphone apps) can record a GPS track — that is, a series of linked points recorded at regular intervals or distances as you move. Normally, these tracks are used for navigation — record where you have been so you can later retrace your route and thus find your way back home. These track files are also good for post-adventure analysis. Your can plot your speed, heading, elevation, etc. You can also use the point data in the track to geotag your photos so that you, and others, can see exactly where a particular photo was taken.

Beyond their practical uses, however, GPX tracks, when displayed as a line on a map, have an aesthetic value as well. They are a virtual mark on the land — the mark of an adventurer expressing some desire to explore. In this way they are not unlike the marks an artist makes on paper or canvas. Lines creating shapes, outlining objects, representing barriers overcome or avoided. Lines demarcating space and time. Tracings and recordings of life.

A Walk In The Park

After a long walk at Bowness Park last March, I overlaid photographs I had taken with the abstract and graphically rich tracings of my GPS tracks. Typically, one displays geo-located photos on a map — saying “this is where these photos were taken.”

But the map is not the terrain. The map is not the location.

Instead, I am displaying the map (in the form of the track overlay) on the photo. This gives the photo context. The image exists in concert with — because of — my movement across the land.

IMG_0977 TrackIMG_0985 Track
IMG_0990 TrackIMG_1008 Track

Photo Walking

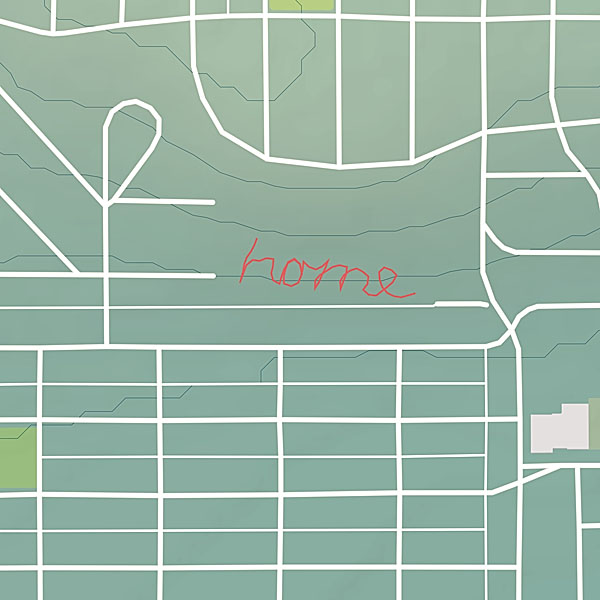
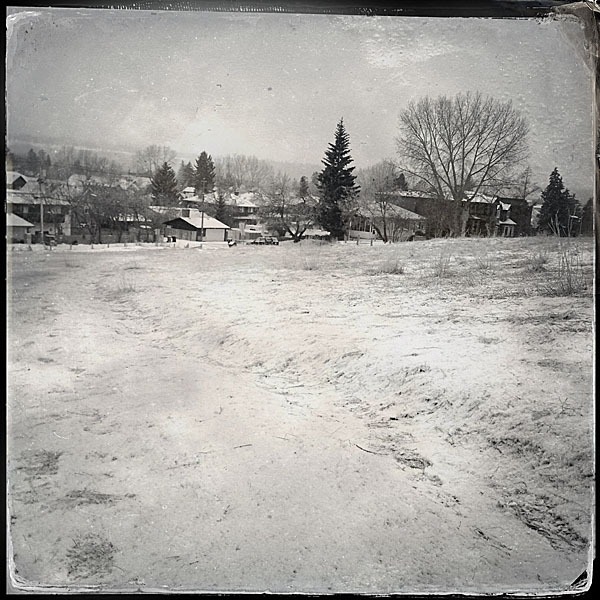
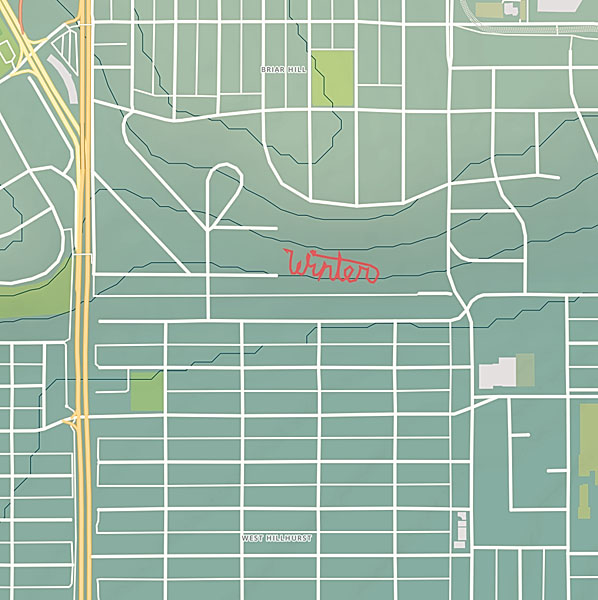
The other project I started, is a series of large scale conceptual drawings. By walking a path across the land tracing the shape of a word, I am making visible some thought, some meditative idea. The word — the path — is not visible to others even though it’s creation is a very concrete act. However, by capturing the path in the form of a GPS track, I am able to share the act with others. The track image, is combined with photos taking during the walk so the viewer can experience the original event.

Winter

Winter - West

Winter - Map

Winter - East

Home

Home - Up

Home - Map

Home - Down

Chainsaw Mill

I’ve had a Granberg Alaskan Chainsaw Mill MKIII for a little over a year now, but apparently haven’t posted anything about it here. This isn’t going to be a detailed review or anything like that. I just wanted to post some pictures of my set-up. I will say that the Granberg mill is a well made, robust, easy to use piece of equipment. For what it is — a portable chainsaw mill — I have no complaints. Highly recommended.

I do wish that Granberg’s EZ Rails (which can be used to make the first cut) were cheaper. I am mostly using my mill to make lumber for timber-frame construction. As such I often need beams of 14′ or longer. The 9′ plus 5′ EZ Rails would cost me about $400.

I initially made my own level-adjusting rails using 2x4s and some aluminum stock. However, the 2x4s have warped and I no longer use them. Instead, I made new rail brackets with integral quick clamps (see the photos) that work with an aluminum ladder. This set-up works quite well, though I am limited to milling logs about 13′ in length by the 14’/28′ extension ladder parts I currently have (I could get a 16’/32′ ladder, but can’t justify the $300 expense). I always find that the set-up for the first cut takes quite a bit of time. And since I am making squared timbers, I have to do the first-cut set-up twice.

I run my mill with a Husqvarna 395 XP (7 hp) chainsaw, a 36″ bar, and skip-tooth chain. Before I got the bigger saw, I ran the mill with a Husqvarna 545 (3.35 hp) chainsaw, a 24″ bar, and a chain modified for ripping. However the 545 didn’t have enough power to efficiently get through logs bigger than 8″ diameter. The 395 has plenty of power and I will probably never need the capacity of the 36′ bar/mill as trees just don’t grow that big on our property.

Another Day In The Office

I took these photos yesterday. The temperature was about 7°C. There was zero wind, a bluebird sky, and ravens soaring through the trees. The snow is very deep this year (near mid-thigh in some places) and I had a bit of trouble getting the quad into the bush to get at the log I wanted to work on. I managed though. I like the system I have for hauling the ladder, mill, saws, and other tools in my quad trailer.

After milling the log I covered it up so it is not exposed to weather. It is down a small hill and I will have to wait a few months until the snow melts a bit to winch it out of there.

Summary

[table th=”0″]
Item,Granberg Alaskan Chainsaw Mill MKIII
Price,C$255
Availability,granberg.com or leevalley.com
Pros,”portable, well made, robust, easy to use”
Cons,”slow set-up for first cut, expensive accessories”
Summary,Highly recommended
Rating,[rating=4]
[/table]

Opinel No. 7 Carbon-steel Folding Knife Detailed Review

This is a follow up to my initial review of the Opinel No. 7 carbon-steel folding knife. I have been using this knife for about 10 days now. I’ve kept it with me almost constantly throughout this time (except while sleeping and showering) and I’ve tried to use it as much as possible. Here are my impressions.

Opinel Carbon-steel Folding Knife No. 7

A Good Everyday Knife

As I noted in my initial review, it took a bit of tuning up before I was happy with this knife. After that initial work though, this knife has been a pleasure to carry and use. I appreciate its lightness, and rarely notice that it is in my pocket. The handle is very comfortable, though I do feel the No. 8 would fit my hand better.

Opening, Closing, and Locking

Opinel Carbon-steel Folding Knife No. 7 — Lock DetailThe folding mechanism is very smooth. I actually like that it does not have a spring tension lock like the type found on most folders, Swiss Army knives, etc. the lack of spring resistance means that the folding action of the Opinel is very smooth — almost effortless. Engaging the fingernail opener slot is sometimes difficult, but almost not necessary. Just disengage the hinge lock, and pull the blade open with your thumb and forefinger.

The fastest method of engaging and disengaging the hinge lock is with a quick swipe of the thumb of your knife holding hand. This is fast, but the lock mechanism does tend to dig into the pad of the thumb. On the plus side, I am getting a nice callous on my thumb.

Blade Performance and Maintenance

I have used the knife to cut just about every material I have encountered over the previous ten days: packing tape, cardboard, envelopes, cheese, bread, pâté, plastic, wood, epoxy, string, etc.

Though a bit short, the blade excelled in the kitchen and for simple food prep tasks. I would not hesitate to keep this knife as a permanent addition to my hiking/skiing lunch bag kit.

The blade performed very good in wood, doing light carving tasks. It was also great for opening packages, etc.

Opinel Carbon-steel Folding Knife No. 7 — Blade Detail
Blade damage after cutting moderately hard material

I did find that the blade tends to lose its edge quite quickly. After cutting anything even moderately hard, the edge is noticeable marred and wanting a quick sharpen. The good news is that the carbon-steel is easy to touch up. Plan to keep a small diamond file around if you get an Opinel carbon knife. A dull knife is dangerous as you have to exert more force and therefore increase the likelyhood of slipping.

One of the first impressions I had about this knife is that its blade is quite thin and flexible. It has a single bevel grind that goes all the way from the edge to the back of the blade (“full-flat” grind). In use, the blade does not flex as much as I thought it might, but still it would not be the best knife choice for heavier work. I have a Leatherman and a medium-size Wenger folder that I wouldn’t hesitate to use carving heavy wood, cutting rope, repairing a canoe, etc., but I would avoid using an Opinel in these cases.

I’ve been pretty good about cleaning and maintaining the blade over my short usage period with this knife. If I used the knife with food and had to clean it with water, I dried it well and applied a thin coat of olive oil (because that is what sits on our kitchen counter all the time). I have had no problem with rust spots or tarnishing. I am curious to see how the carbon-steel holds up over the long term.

Summary and Specifications

Opinel folding knives seem to be a real bargain. The No. 7 is a compact and lightweight folder that would be a good everyday knife. You won‘t even notice it in your pocket, and it will stand up to most typical tasks you will encounter. If you need a serious work knife, consider something else, or try one of the larger Opinel sizes. If you are hard on gear and don‘t feel up to the task of maintaining a carbon-steel blade, then consider getting the Opinel stainless-steel version instead.

Opinel Carbon-steel Folding Knife No. 7 — Open

[table th=”0″]
Item,Opinel No. 7 Carbon-steel Folding Knife
Price,C$15
Materials,”Beechwood handle, carbon-steel blade, stainless-steel lock”
Length,”77 mm (3 in) blade, 177 mm (7 in) overall, 100 mm (4 in) closed”
Weight,”37 g (1.3 oz)”
Availability,mec.ca or leevalley.com
Pros,”lightweight, comfortable handle, easy to open/close/lock, easy to sharpen, nice aesthetic”
Cons,”factory finish needs some tuning-up, carbon-steel requires more care, requires sharpening often, light-duty blade, handle is small in average male hand”
Summary,A good value folding-knife for everyday light-duty use.
Rating,[rating=4]
[/table]

Handmade Leather Handled Knife and Leather Sheath

I became a fan of fixed blade knives rather late in life and have started to experiment with different handle materials. I never really understood the appeal or construction of leather knife handles, but I became intrigued and decided to make my own.

A leather knife handle is actually made from a stack of compressed, glued, and shaped leathers “washers”. The form and feel of the handle comes from the leather, but the strength comes from the tang and the rigid bolster and butt/pommel reinforcements.

I used a commercially available 6″ carbon-steel blade blank from Morakniv as the basis of this knife. Most leather handled knives I have seen are of the hunting-knife variety, so I decided that a larger knife would be better.

Leather Handled Knife Belt Loop DetailFor the most part, I followed an excellent tutorial in the British Blades forum. I deviated a bit from the tutorial by hiding the tang under the butt cap and securing the butt cap with two 1 1/4″ #14 screws. This was not my original plan, but I had trouble riveting the butt cap to the tang. I sanded the screw heads flush with the butt, though two small depressions from the driver holes remain visible — not the most professional job, but a strong and fully serviceable arrangement.

Today I finished making the leather sheath. I like a Scandinavian-style sheath, which is stitched at the back and holds the knife with simple friction rather than a complicated snap and/or strap.

Leather Handled Knife in Blade GuardThe sheath is lined with a hand-carved cedar blade guard. After seeing an interesting comparison of the performance of various sheath materials in wet and frozen conditions I decided to make a drain-hole at the tip of this blade guard. If water gets in the sheath, it will simply drain out the bottom. I also applied a good coat of paraffin wax to the blade guard interior to discourage moisture build-up. The devil is in the details, as they say.

I tried to match the coloration of the sheath with the knife handle. I first dyed the sheath brown, applied a bit of yellow dye, and then applied USMC black dye. The black dye I applied sparingly only to the tip of the sheath, and then with a cloth, blended it into the brown. I repeated this a few times until I had a nice smooth blend from solid black at the tip to warm brown at the top.

Leather Handled Knife StitchingI hand stitch all my sheaths. Normally I make my needle holes with an awl, but on this sheath I used my recently purchased hand sewing punch. This is a great tool and created even and consistent stitching holes. I still had to use a fid/awl to slightly enlarge the insides of the holes so I could easily pass the needles, but in general the punch really sped up the hand-sewing process.

Though it had some challenges I really enjoyed this project. I like the lively feel of the leather handle surface. I compared it to a 6″ Buck plastic handled knife I have which feels dead by comparison. I am also, once again, very happy with the combination of the knife and the sheath. I got into knife making from working with leather, so it makes sense that I put a high value on the sheath.

I like to give my knives a name. I will call this one Gandalf The Mad, after the unscrupulous and cruel Viking Chief from the Thorgal comic book series. It gave me some trouble, has a complex and dark exterior, but also a spark of power and nobility.

Gandolf the Mad

Blade: 6″ High-carbon-steel Morakniv blank

Handle: vegetable-tanned leather, African Rosewood, aluminum, carnuba wax

Sheath: hand-carved cedar blade guard insert, hand-dyed and hand-stitched vegetable tanned leather, riveted belt loop

Leather Handled Knife in Handmade Sheath

Leather Handled Knife


Opinel Carbon Steel Folding Knife No. 7

I have been seeing Opinel knives appearing on my Tumblr dashboard for a while now. I recently wrote about my experiences with my wife’s Opinel when we first met. Needless to say I wasn’t impressed with Opinel at the time. But a lot of people seem to be using them so I decided to get one for myself to put it through its paces. Opinel knives — hipster accessory or serious tool with a history?

Opinel knives have been manufactured in France by a family owned company continuously since 1890. Long recognized for its simple utilitarian design, the classic Opinel knife is available in 12 sizes. The standard knife employs a carbon-steel blade and beechwood handle. The folding mechanism incorporates a rotating lock-collar which, when activated, prevents the blade from opening or closing accidentally. A stainless-steel version and alternative handle materials are also available.

I picked up a No. 7 Opinel yesterday from MEC for $15 dollars. (Lee Valley is another good source of Opinel knives for Canadian buyers.)

The No. 7 size, with a 3″ (7.5 cm), blade seems like a good compromise between utility and compactness. This would be a good everyday pocket knife or backpacking knife. The larger No. 8 size might be a better shop or camp knife. I usually prefer a slightly larger knife if for no reason other than having a larger handle which often fits my hand better. The No. 7 handle feels fine in my hand though.

I am not sure about other retailers, but MEC sells this Opinel knife in a sealed plastic clamshell package. I hate this form of package as it seems very wasteful and is extremely difficult to open.

[pullshow id=”pq1″]After I got the package open I had to remove a magnetic ant-theft sticker attached to the handle. Of course a sticky residue remained on the handle afterward and I had to resort to scrubbing the handle with mineral spirits to get it clean. Stickers on products is another pet peeve of mine. If a manufacturer sticks a hard-to-remove label, etc., on their product they are basically saying they don’t care about the customer or the products they sell.

Inspecting the knife for the first time, I was [pullthis id=”pq1″]impressed by its lightness, and by the quality of the wooden handle and simple locking mechanism[/pullthis]. The blade was okay, though the edge was basically blunt for the the entire length of the curved tip. I also did not like the subtle grinding marks left on the sides of the blade. But what should I expect from such an inexpensive tool? The back of the blade had extremely sharp 90° edges which were not pleasant to handle, either when opening/closing the blade or when holding the knife in my pocket.

A bit of extra attention to detail and Opinel knives could be very nice right out of the box. But [pullthis id=”pq2″]as they are sold, they need a bit of a tune-up[/pullthis].

[pullshow id=”pq2″]I spent the better part of an hour today, filing the tip to a sharp edge, sharpening the knife with an oil stone and leather strop, easing the profile of the back of the blade with a bench belt sander, and polishing the blade with some buffing wheels and abrasive compound. With a properly sharpened blade and a more comfortable blade back profile, the knife feels and performs better. I oiled the blade and lock mechanism and now it feels like I have a quality product to work with.

I will be carrying this knife around for the next few weeks and I will post an updated review after working with it for a while.

Update: I have posted my detailed review.