Handmade Leather Handled Knife and Leather Sheath

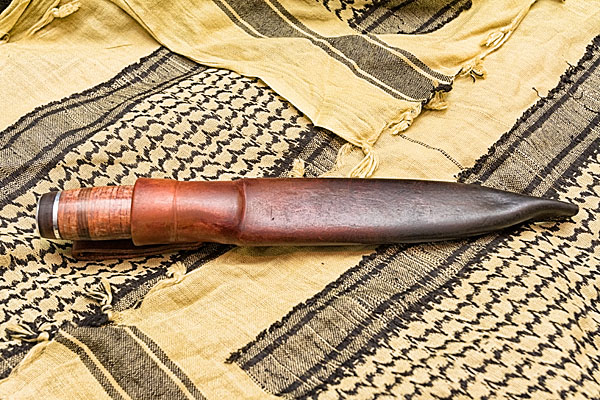
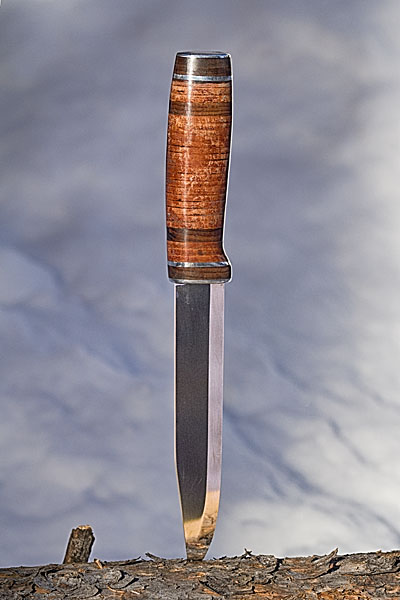
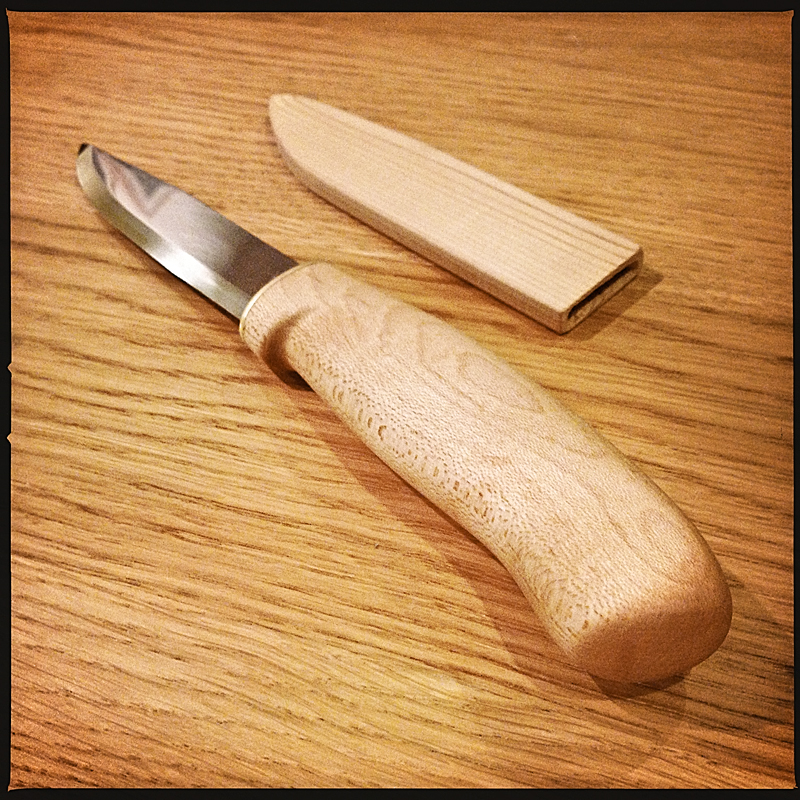
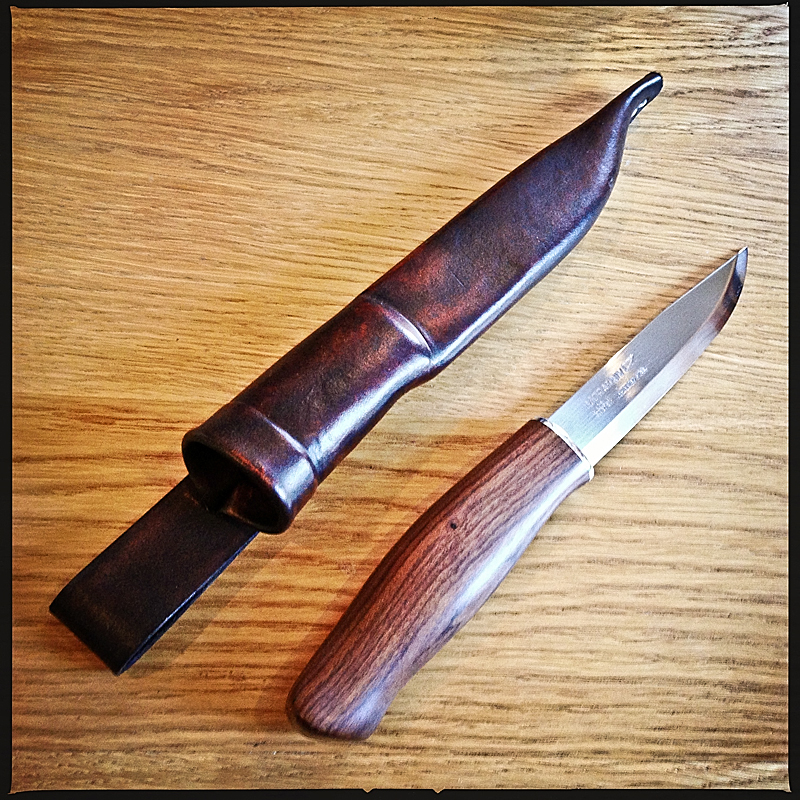
I became a fan of fixed blade knives rather late in life and have started to experiment with different handle materials. I never really understood the appeal or construction of leather knife handles, but I became intrigued and decided to make my own.

A leather knife handle is actually made from a stack of compressed, glued, and shaped leathers “washers”. The form and feel of the handle comes from the leather, but the strength comes from the tang and the rigid bolster and butt/pommel reinforcements.

I used a commercially available 6″ carbon-steel blade blank from Morakniv as the basis of this knife. Most leather handled knives I have seen are of the hunting-knife variety, so I decided that a larger knife would be better.

Leather Handled Knife Belt Loop Detail
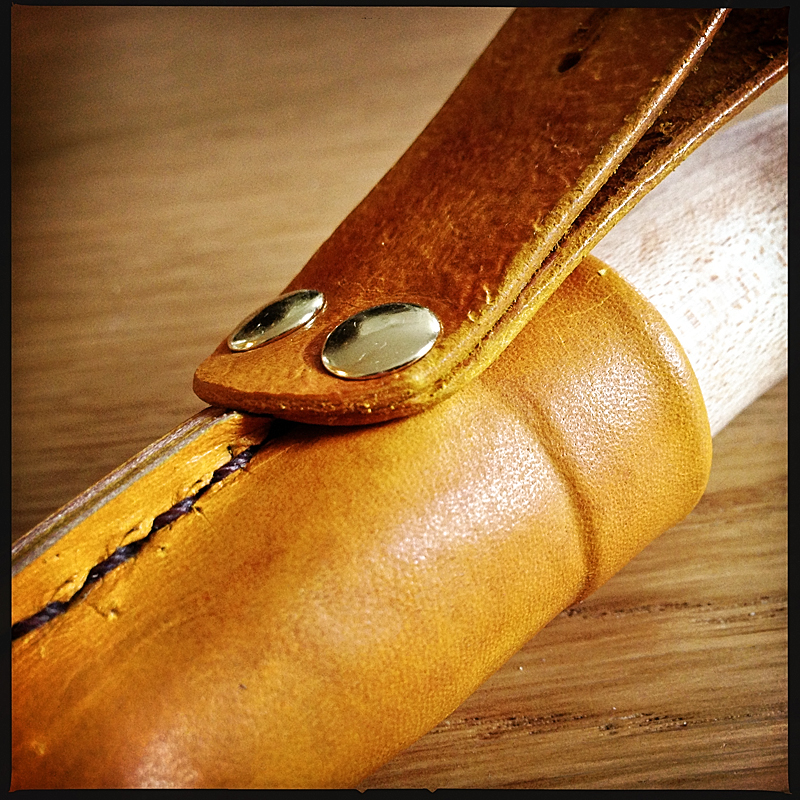
For the most part, I followed an excellent tutorial in the British Blades forum. I deviated a bit from the tutorial by hiding the tang under the butt cap and securing the butt cap with two 1 1/4″ #14 screws. This was not my original plan, but I had trouble riveting the butt cap to the tang. I sanded the screw heads flush with the butt, though two small depressions from the driver holes remain visible — not the most professional job, but a strong and fully serviceable arrangement.

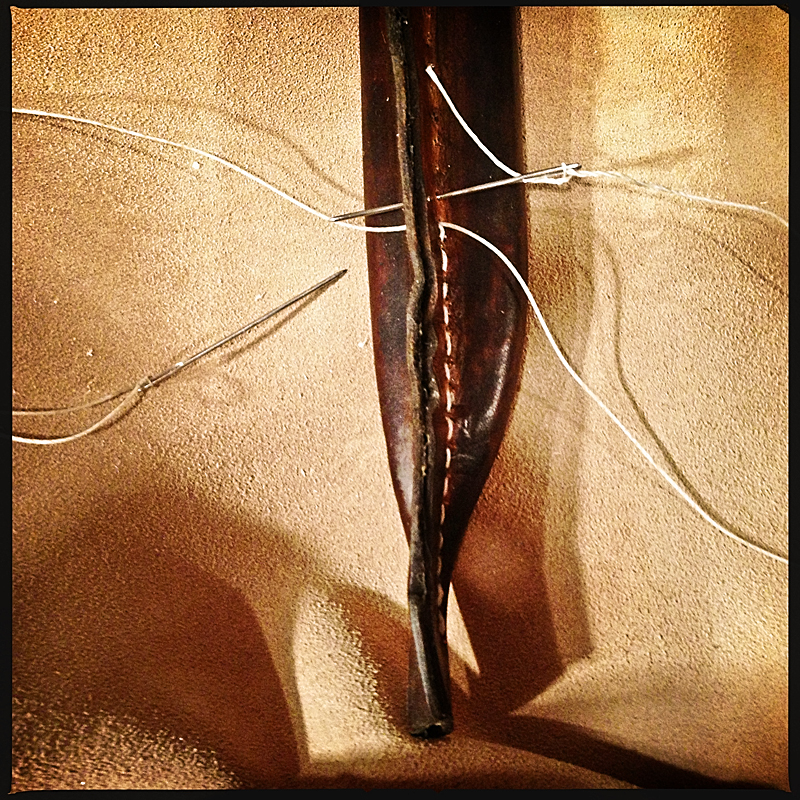
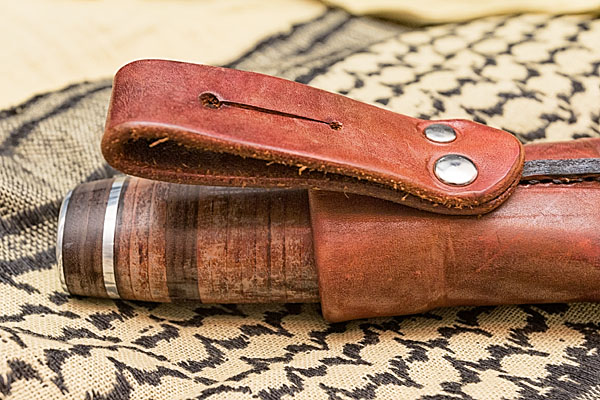
Today I finished making the leather sheath. I like a Scandinavian-style sheath, which is stitched at the back and holds the knife with simple friction rather than a complicated snap and/or strap.

Leather Handled Knife in Blade Guard
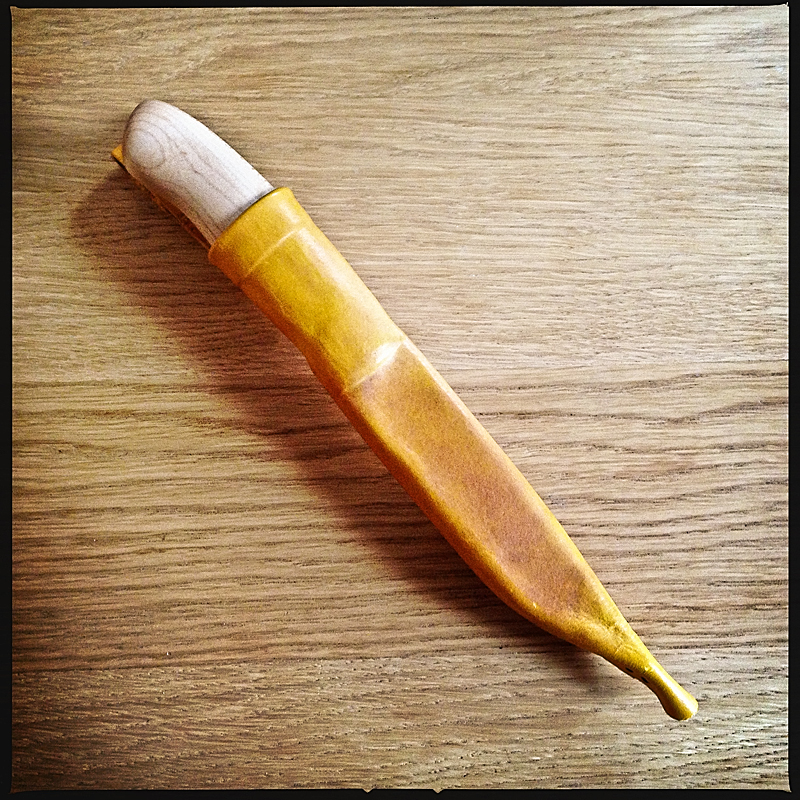
The sheath is lined with a hand-carved cedar blade guard. After seeing an interesting comparison of the performance of various sheath materials in wet and frozen conditions I decided to make a drain-hole at the tip of this blade guard. If water gets in the sheath, it will simply drain out the bottom. I also applied a good coat of paraffin wax to the blade guard interior to discourage moisture build-up. The devil is in the details, as they say.

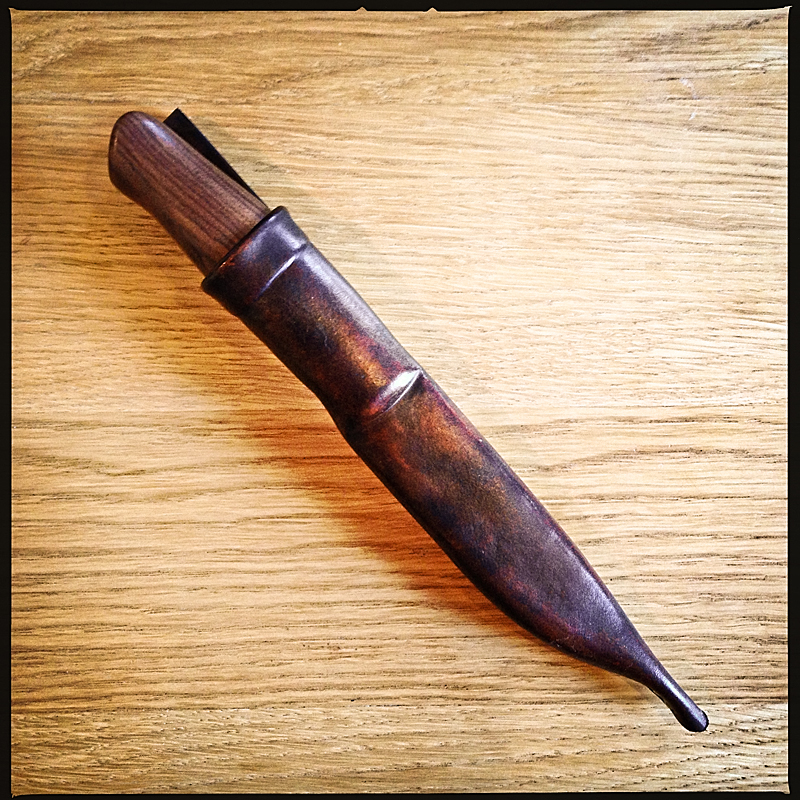
I tried to match the coloration of the sheath with the knife handle. I first dyed the sheath brown, applied a bit of yellow dye, and then applied USMC black dye. The black dye I applied sparingly only to the tip of the sheath, and then with a cloth, blended it into the brown. I repeated this a few times until I had a nice smooth blend from solid black at the tip to warm brown at the top.

Leather Handled Knife Stitching
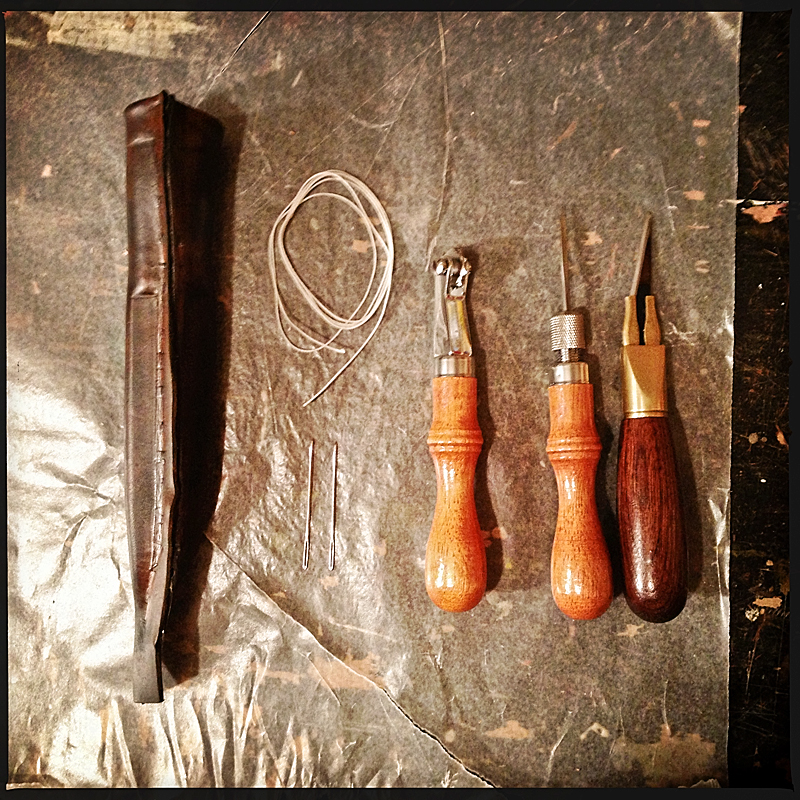
I hand stitch all my sheaths. Normally I make my needle holes with an awl, but on this sheath I used my recently purchased hand sewing punch. This is a great tool and created even and consistent stitching holes. I still had to use a fid/awl to slightly enlarge the insides of the holes so I could easily pass the needles, but in general the punch really sped up the hand-sewing process.

Though it had some challenges I really enjoyed this project. I like the lively feel of the leather handle surface. I compared it to a 6″ Buck plastic handled knife I have which feels dead by comparison. I am also, once again, very happy with the combination of the knife and the sheath. I got into knife making from working with leather, so it makes sense that I put a high value on the sheath.

I like to give my knives a name. I will call this one Gandalf The Mad, after the unscrupulous and cruel Viking Chief from the Thorgal comic book series. It gave me some trouble, has a complex and dark exterior, but also a spark of power and nobility.

Gandolf the Mad

Blade: 6″ High-carbon-steel Morakniv blank

Handle: vegetable-tanned leather, African Rosewood, aluminum, carnuba wax

Sheath: hand-carved cedar blade guard insert, hand-dyed and hand-stitched vegetable tanned leather, riveted belt loop

Leather Handled Knife in Handmade Sheath

Leather Handled Knife


Bucksaw

I’ve seen a few nice handmade bucksaws on the internet recently and decided I’d make one.

I used a 21″ blade from an ugly metal commercial bucksaw as the basis of my saw. I had a small piece of ash that just yielded the frame parts I needed. I chose maple for the tensioning toggle because it is dense and strong and I had some thin scrap laying around from paddle making. I used some leather cord for the tensioning string.

The milling of the wooden parts was was quite straight forward with the design’s simple straight lines. The longest time was taken trying to decide how to make the blade mounts. I had several ideas, but the most straight forward seemed to be just to tap the handles to take a hex socket cap screw. The screws are easily tightened and loosened by hand, and even without using a hex key are quite secure when the blade is under tension. The crossbar is attached to the handle pieces with blind mortise and tenon joints which were quite fun to cut. The lower grip saw kerf (made by the bandsaw but only the top portion of which is needed to hold the bucksaw blade) is filled with a 3/32 inch strip of cedar which provides a nice accent (visible in the bottom of the close-up photo of the grip).

The upper and lower grips of the long handle are wrapped with rawhide cord using what The Ashley Book of Knots terms common whipping. This is the first time I have used rawhide on a project and am glad to have added it to my repertoire. (I bought some more ash to make a pair of wood and rawhide snowshoes!)

The maple toggle was simply decorated with a wood burning pen. All the wood parts are finished with linseed oil. The leather tensioning cord is coated with beeswax (for improved weatherproofness) and tied into a loop using the double fishermen’s knot. The rawhide handles are sealed with three coats of Helmsman’s spar urethane.

The saw quickly and easily breaks down into a small, light package. I have some raw canvas that I am going to dye and which I will use to make a storage roll for the bucksaw. I’ll post pictures of the broken down saw and tool roll after it is complete.


Leather Buttons

How-to Make Leather ButtonsMy sister is a button fanatic. She has a huge button collection, and many of her creations prominently feature buttons, either functional, or as decoration. Her blog regularly features button finds, and because of her I am always keeping my eye out for button related stuff.

When I came across a short but excellent article over at Ped’s & Ro describing an experiment in making buttons from leather, I was intrigued. The process seamed simple and the result elegant — the key ingredients of any good design. I decided to try my hand at creating some of my own leather buttons.

Please read the Ped’s & Ro blog for the detailed instructions. I will just add a couple of tips here regarding cutting out the buttons and finishing.

It is difficult to cut smooth curves in leather at the best of times. Combine thick leather and a small radius circle and you are just asking for trouble. The standard solution would be to use a round punch to create the button shapes, but typical round punches only go up to about 1/2″ in size, which is only good for smaller buttons. I didn’t have a round punch this size, and didn’t want to buy one for this exercise, so I economized and used my 1/2″ strap-end punch to make the circles (the “circles” are just really short 1/2″ straps!) I made some 1″ buttons with my 1″ strap-end punch, but it’s curve is not perfect so the buttons are not absolutely round.

I subsequently found (and purchased) a (rather expensive) versatile large punch set at Lee Valley (several punch sizes can even be used concentrically to create washers, etc.) The Lee Valley round punch set includes dies for cutting 3mm to 30mm holes. A good find.

I suppose there is no law that says buttons must be round, so if you are without a punch you could try other shapes.

I burnished all the surfaces of my buttons quite a bit, using gum tragacanth and a wooden edge slicker. The result is a smooth finish, but the process is a bit tedious given the small buttons and my big fingers.

After the buttons dried I finished them with a satin acrylic coating to protect them from the elements and hopefully keep them smooth longer.

I used one set of buttons on an insulated flannel shirt that I bought last fall. I wear this shirt all the time — outside in moderate weather, and inside on cold days. It’s great for slipping out to get some wood for the fireplace, etc. There was only one problem with this shirt — the original buttons were a tad too small and became undone whenever I moved, breathed, or the wind changed direction. The replacement leather buttons are a perfect fit, stay closed the way they are supposed to, and complement the existing leather accents.

I will definitely be making more leather buttons and working on refining the process.

Leather Belt

I’ve been wanting to make some leather belts for some time now. I bought some buckles and belt blanks a while ago and had an idea of what I wanted to do with them, but never got around to it…until now.

My wife and I are season subscribers to Calgary’s premiere arts theatre, Theatre Junction. We really enjoyed a local production from a few years ago about a family stuck in a cabin surrounded by menacing dear (I’m paraphrasing here). During the performance, the person playing the deer sang a song, which basically went like this, “I am a deer, deer.”

When I bought a deer-head-shaped leather embossing stamp last year, I just knew that I would use it, in combination with the phrase “I am a deer, deer”, in the making of some belts for my wife and I.

I like the lighthearted combination of fashion and whimsy. I try not to take things too seriously. These manly leather belts are given a slight twist by the subtle irreverence of the kitschy deer head on the buckle and Dadaist text adorning the back of the waist.

Knife Making

Thorgal Aegirrson
Thorgal Aegirrson

Shortly after I started collecting axes, my wife travelled to Norway. She wasn’t prepared to pack a Scandinavian axe in her suitcase as a present on her return, so instead she brought me a Brusletto knife direct from the factory in Geilo. When I received that knife I instantly got the idea that someday I would make my own knives.

I recently expanded my knife collection with Norwegian, Swedish, and Finnish examples from Helle, Mora, and Laapin Puuko. All of the knives from each of these manufacturers is a high-quality product. The quality and finish varies depending on the amount of handwork that went into each knife (the more handmade, the better). There are a few other brands that I would like to purchase knives from (for example, Roselli of Finland), but for now I decided to make a few knives of my own.

At my wife’s recommendation I recently started reading the Thorgal saga fantasy comic series. (Yes, I have the coolest wife ever.) I took the two main characters, Thorgal and Aaricia, as the thematic inspiration for my first two knives. For both knives I used 4 1/4″ Mora laminated steel blade blanks purchased from Lee Valley. Each knife then takes visual queues from its namesake: Thorgal — hand-shaped African Rosewood handle, polished aluminum bolster, and dark-brown handmade leather sheath with contrasting thread and nickel rivets for the belt loop; Aaricia — hand-shaped maple handle finished with linseed and tung oil, brass bolster, and dark yellow handmade leather sheath with contrasting stitching and brass rivets for the belt loop. Each sheath features a hand-carved cedar blade guard insert.

Aaricia Gandalfsdotter

Each knife is a slightly different shape and incorporates features I’ve seen in various other Scandinavian knife designs. I quite enjoyed the process of shaping the handles (and it was a good excuse to get a new desktop belt/disc sander). Since the knives took shape in my hands, they feel very natural to hold and use. As nice as the commercial knives in my collection are, they were not custom made for my hand and therefore are a bit of a compromise in terms of fit, balance, and dexterity.

This project was also a good excuse to do some leatherwork. I am very happy with the sheaths for each knife. Each is as good or better quality than any of the sheaths that came with my commercial knives.

I have a few more Mora blade blanks that I will be using to make a more knives. Just looking for my inspiration right now. In the future, I would like to get a small forge set-up to make my own blades. I also want to make a crooked knife for carving canoe paddles — another project I have on the go right now.


Leather Moccasins

The most comfortable shoes I ever owned were a pair of tall buckskin moccasins I had when I was a kid. I would even wear them in winter. With a pair of wool socks, they were better than clunky snow boots.

This evening I finished making a pair of basic moccasins to use this winter as house shoes at our cabin. The outer is oiled leather bound with heavy lace. The insole is a thick 8 oz. piece of leather. They are quite comfy.

The best part: they are so easy to make. I know what everyone in my family is getting for Christmas this year 😉


p.s. Sorry I haven’t posted in a while. I’ve been spending all my blogging time on Tumblr. There will be more activity this winter, I promise.

Leather Bird Scares

After the first snow my wife and I went out to the cabin. When we pulled into the driveway I saw something laying on the front sidewalk, near the front door. Even from a distance I could tell that it was a large bird of some sort. It was dead. My initial hypothesis was that it hit one of the windows, fell to the ground, and roll a few centimetres. Walking about 20 meters away from the house I could see that the large two storey front entry windows reflected the brightly lit forest perfectly. The bird, flying at full speed, did not see the glass. It only saw the reflected forest. It likely died instantly.

On subsequent visits I heard birds striking the windows, but have not witnessed further casualties.

I often see bird silhouette stickers placed on large windows to prevent birds from flying into them. I thought that this might be something we should install at the cabin, but wanted something a little more aesthetically pleasing than the standard bird-scare stickers.

I made several distinctive bird owl, hawk, and harrier, silhouettes from 6 ounce leather dyed black. I only used a single coat of dye and let some of the leather show through so the shapes are not pure black. For fun/education, I stamped the species name of each bird into the leather using 1/4 inch high block letters.

I will try installing the bird silhouettes on the inside of the windows using suction cup hooks. If the bird silhouette don’t work inside the windows I will move them outside and may have to hang them from string.

We really enjoy all the birds that frequent the cabin. I’m not trying to to scare them all away. I’m just trying to keep them from hitting the windows.

Deer Axe Sheath

My sister and brother-in-law have been asking me for a while to make a sheath for their axe. The family was getting together yesterday for dinner to celebrate my sister’s birthday so I told my brother-in-law to bring over his axe so I could take a look at it.

Deer Leather StampThe axe in question is a 3 1/2 pound hardware store model with a 36 inch handle. One look and I could tell that the butt had been abused (apparently by striking it with a hammer). However, the eye was not distorted so it was not a total loss. I gave my siblings a few wood chopping hints so they can avoid damaging the head when trying to get through the large, knotted logs we tend to get in local campgrounds. The grain in the handle is far from ideal, running perpendicular to the orientation of the bit. Well, we can fit a new handle some other time.

I happened to be at Tandy Leather Factory yesterday morning and acquired a few new leather crafting tools and supplies. I decided to use my new 3D deer head stamp and oxblood-coloured dye on this sheath. A light gel antique coat over the dye really brings out the grain of the leather and the detail of the stamp.

While the sheath was drying, I took some time to clean up the axe. I peeled the ugly manufacturer’s sticker* off the handle, cleaned off the sticky residue, filed off the mushrooming edges of the butt, and sharpened the bit. Normally, when doing a full restoration, I like to strip all the paint off the head and sand down the handle, replacing any lacquer finish with linseed oil and beeswax. However, I know my siblings will appreciate something a little lower maintenance, so in this case I opted to simply re-paint the head matte black.

All-in-all the axe looks a lot better now than when it came into my shop. I hope my sister and brother-in-law are pleased with it when they see it.

My wife thought the sheath looked pretty good, but she did ask a funny question when I showed it to her, “Is’t that the axe that Marcus cut his finger with and then had to go to the hospital to get a bunch of stitches?” Yes, indeed.


* I was just ranting to my wife the other day about one of my pet peeves: stickers on products. To me, the worst thing a maker of things can do after spending precious resources designing and manufacturing a product is slap a nigh unremovable sticker on the thing before shipping to the consumer. At best, stickers slapped on the finished product are an annoyance to your customer, and what company would purposefully want to annoy its customers? At worst, a crappy sticker symbolizes the lack of pride the maker has in the product they produce and a total lack of respect for me as a consumer and human being. Even if I’m buying a plastic tub from Ikea, I want to think that the people who made it had the goal of creating the best damn tub in the world. If they slap a sticker on it, and I have to scrub, and scratch the surface to get the sticker off, then I think the manufacturer doesn’t care about the product or the fact that I have to live with it everyday.


Leather and Denim Shoulder Bag

Leather and Canvas Bags inspiration
Inspiration

I admit it. I’m addicted to tumblr. I’ve spent a lot of time on tumblr lately — time I should have been using preparing for Christmas.

I’ve been seeing a lot of canvas and leather bags in the tumblr posts by people I follow. I love the simple utility of theses bags. One day recently, I saw a variation on these leather-strapped and -bottomed bags made from what looks like an old Indian rug. It reminded me of old carpet bags. I thought this would be a great idea for a bag — recycling something old into something new.

I have a pile of old jeans waiting to be sorted and taken to the thrift store. Looking through the jeans, I thought that a denim and leather shoulder bag would be just the thing for my sister’s Christmas present. She is very pregnant right now and I figured she could use the bag as a diaper bag. That and I had no other good ideas of what to get her. With only 30 hours left until Christmas, I went to Tandy Leather Factory and bought some tan oily leather and various buckles. I did a quick sketch of my idea. It seemed straight forward enough, but I didn’t know if I could pull it off in time for Christmas.

Denim and Leather Bag sketch

The morning before Christmas day, I started my project by measuring out and cutting all the leather parts I would need. I dyed all the pieces and set them aside to dry. We were having guest over for Christmas Eve dinner, so I had to set the project aside for the remainder of the day while my wife and I cleaned the house, top-to-bottom. (Did I mention I’d had a small surgery on my foot less than 48 hours earlier, and was not supposed to be walking around too much? )Late in the evening, before going to bed, I put the finishing protective coating on all the straps.

On Christmas day, I awoke at around 6 AM. My parents were hosting Christmas dinner, but I was responsible for the pies. I went to work straight away, making my crust by hand. Once I had the two pumpkin pies in the oven I headed to the dining room (which is also my craft room) and got to work on the bag project.

Leather and Denim Bag

I selected an old favourite pair of dark blue jeans for the body of the bag. I cut off the legs and had to do a bit of work transforming the top part of the jeans into a basic bag shape. I got to work adding the leather bottom to the bag. Things started to slow down: I was running low on the thread I was using; my machine was not happy about the heavy thread, four layers of denim, and two layers of leather; and I was getting frustrated. This was the point when I almost gave up trying to get this done as a Christmas gift. However, I persevered, and the body of the bag finally came into shape. With the body complete and the straps all ready, I headed down to my shop to rivet all the pieces together. (In the summer I had splurged and bought a hand-press and dies for setting snaps and rivets — using a hammer and punch is slow and tedious. The hand-press is more efficient and consistent. Having the hand-press is the only reason the bag was done on time.)

I had the bag fully assembled and complete by 2 PM. Did I mention that I still had to wrap everyone else’s presents?

By 3pm, my wife and I were in the car heading over to my folks. After a quick hello and a little snack (I had not eaten yet) the family started tearing into the gifts.

My sister loves the bag. Apparently she had been coveting a Pendleton bag similar to the one that was my inspiration. The denim bag saves her a few bucks and she can tell everyone it was hand made by her child’s crafty uncle.

Okay, time to go check in on tumblr.

The Complete How-to Book of Indiancraft

My grandfather gave me this book when I was 10 years old. He was a true mountain man and loved collecting and restoring old rifles. His home was the ultimate young boy’s playground.

Book-Cover-Indiancraft

Book-Cover-Indiancraft-dedication

I can’t watch Jeff Bridges in True Grit without thinking of my grandfather – the physical and vocal resemblance is uncanny. This drawing by my aunt gives you the idea (my grandfather was a welder).

Carl-Stoddard-Welding-by-Carol-BarberTrue Grit Movie Poster