Cloudscapes Photographic Series

Cloudscape 2017-01-30

Cloudscapes is a photographic series that builds upon my previous Sky Panoramas series1. The photographs depict portions of the sky containing interesting clouds, colours, lighting, etc. I consider cloudscapes a sub-genre of landscape photography, but with my lens pointed towards some point in the sky instead of the ground.

Light and colour are often the main subjects, rather than just an aspect of sculpted solid surfaces as in landscapes. Clouds replace mountains. The inky blue of space replaces lakes, rivers, or seas.

One could say that photographing clouds is the same as photographing water. Clouds are a fluid medium that reflect and filter light.

Unlike the land, which is sculpted by light but remains substantially static (at least during the instant of a photograph), the sky is extremely dynamic. The shape and position of clouds changes from second to second. The position of the sun is constantly moving. Land is frozen. The sky is liquid.

When photographing the land, vantage points and compositions can be very limited (depending on what one is trying to capture). Move a few centimetres left or right, a few metres forward or back, and the composition changes or disappears. A branch fails to frame a pond. A rock no longer lines up with the mountain peak. A leading line doesn’t guide the eye into the scene.

In a wide-open space the sky is viewed as an uninterrupted hemisphere, 180 degrees across and 360 degrees in circumference. A photographer can point their camera towards the sky in any direction. They can shoot with a wide angle or telephoto lens to crop or expand the captured scene. There is no horizon that must be kept level. No trees that must remain upright. Clouds move and create an ever changing canvas of colour and light. But in all this freedom there must be constraints. Choices must be made. Balance must be found.

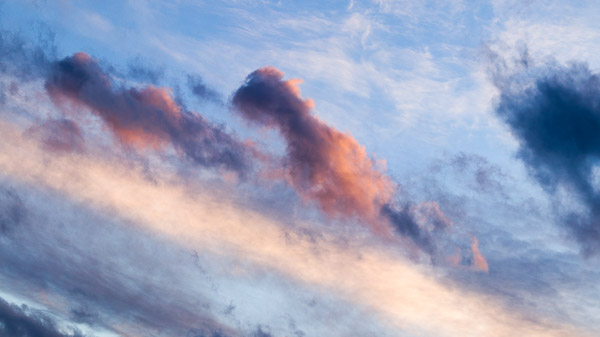
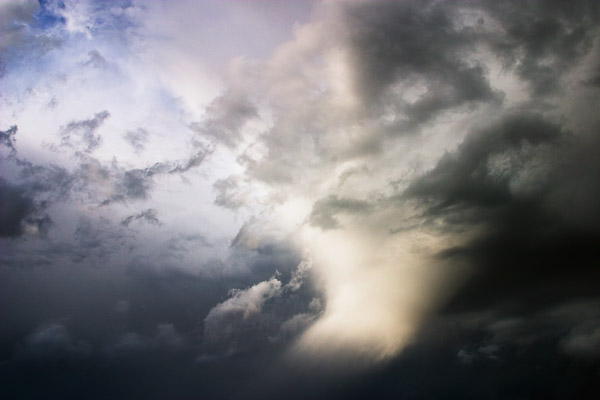
Some skies lend themselves to a painterly presentation. Colourful gradients, soft edges, and limited depth create an impressionistic or abstract quality. Some skies are dramatic, with raking or filtered light. Some skies seem less dramatic, but with a telephoto lens the photographer can isolate crisply detailed structures in fluffy cumulus clouds — distant sculptural castles floating in space.

Cloudscapes are ephemeral. They sometimes exist for a fraction of a second. They can be captured by the camera’s lens in that one instant and will never be seen again.

Sky Panorama #3, 2007

I first became aware of photographing the sky while studying photography in university. In a photography history class I became acquainted with Alfred Steiglitz’s cloud photos — the so-called Equivalent series.

“I wanted to photograph clouds to find out what I had learned in forty years about photography,” wrote Stieglitz in an artist statement2.

While Stieglitz’s reasons for photographing clouds differ from my own, I immediately had an affinity for his subject matter.

Silverview 2017-01-06 08:29 Wide
Silverview 2017-01-06 08:29

I have another on-going photographic series called Silver View in which I record the ever changing view out my living room window which looks out on a natural park. In those photographs the scene is often dominated by an interesting sky or atmospheric phenomenon (e.g., fog, a rainstorm, a snowstorm, or a dramatic sunrise), but always the sky is shown in relation to the land. The Silver View series is very much rooted in place. It is about recoding the view from one particular location.

The Sky Panoramas, and by extension the Cloudscapes, question the notion of place and our identification with it. Does the sky represent the land over which it hangs? Can the sky over my house be differentiated from the sky over a Parisian suburb? Can we recognize the sky as belonging to a place or is the sky a separate space all together? Are we travelling through the sky as we are rooted to the land? Are we shaped by the sky (does it mold our identity) as we so often seem to be shaped by the land?

Cloudscape 2017-01-30

As with many series, there is no actual limit to how many Cloudscapes I can photograph or for how long I can continue exploring this theme. Therefore I impose limits in other ways. The primary limits appear in post-processing.

Images are not just taken out of the camera and printed or shared. While it is often difficult to capture the dynamic range of both the land and the sky in a single photograph, the dynamic range of a small portion of the sky may be extremely limited. Atmospheric perspective may reduce contrast to the point were a portion of the sky appears as a flat, featureless field. This would be a boring photograph indeed.

To add dynamic range and contrast I primarily manipulate the white and black points of the image. Delicate colours that are nearly invisible to the casual viewer begin to appear as the contrast increases. Structures with shape and modelling begin to form. While each final image can be considered dramatic it must still be a realistic representation of the scene. An image not pushed far enough will be flat and featureless. One pushed too far will be destroyed. Knowing how far to push an image is the art.

It is sometimes hard to know at the moment of capture if an image will stand up in post-processing. Some images that seem dramatic in the viewfinder are just too contrasty to tame. Some images that seem mildly intriguing become favourites when a little processing starts to reveal subtle colours or playful compositional relationships. Therefore I shoot a lot of frames and keep only a few of the very best results.

Spring Shower 1, 2006 (Sky Panoramas Series, but really also the first Cloudscape)
Spring Shower 1, 2006 (Sky Panoramas series, but really also the first Cloudscape)

To be clear, I do not look for recognizable shapes in clouds. I look for abstract compositions in the sky.

The average landscape photographer knows that there are select few hours around sunrise and sunset that are “best” for shooting. Trust me, I relish those times. I can’t always schedule my day to shoot during those “golden hours” so I have learned to make the best of any time of day. On sunny days I shoot black and white and capture the dramatic shapes and shadows of trees and rolling hills. On overcast days I focus on the colours and delicate details in close forests.

With the sky as the subject, selecting good times to photograph is more difficult. On blue-sky or overcast-sky days there is nothing to photograph. Better then to shoot traditional landscapes or macros. Sunrise and sunset are not guarantees of finding a good sky subject either. The sun might be too intense and colours too saturated. Clouds might not be in the right place in relation to the rising/setting sun to filter or reflect the light in a compelling way. In other words, opportunities to shoot images for the Cloudscapes series are not overly common.

It is hard to say what compels me to pick up my camera at any given moment and point it towards the sky. I can’t schedule a Cloudscapes photography session. In a very zen way I have to wait for the right moment. The sky dictates when it wants to be photographed.

Sky Gradient 2016-01-08 #4

  1. Sky Panoramas is a series of stitched multi-frame panorama photographs. The images have a very high aspect ratio (up to 5:1). Cloudscapes are a single frame photograph. It can take a minute or more to capture the 9 to 12 frames used to create the Sky Panoramas and thus they are infinitely more difficult to capture than Cloudscape images, especially if clouds are moving at any speed or the light is changing. Post-processing is also more demanding with Sky Panoramas, the files of which range in size between 500MB and 1GB. Sky Panoramas are also difficult to present on screen or on print due to there wide aspect ratio. As a compromise, I often find myself composing Cloudscapes in 16:9 aspect ratio. A third related on-going series, Sky Gradients, includes photographs of the colour gradient of the sky, usually just before sunrise or after sunset when the light is soft and the sky takes on a pastel hue. Sky Gradients are shot on cloudless days, though a slight haze in the atmosphere acts as a colour filter. The majority of a Sky Gradient frame is taken up by the sky, but a strip of horizon often appears at the bottom edge.
  2. https://sandrakontos.wordpress.com/2012/12/14/alfred-stieglitz-equivalents/

Flickr Gallery

Cloudscape
Click to launch the Cloudscapes Flickr gallery…

GPS Drawing

Last year, after I started geotagging my photos, I did a few visual art projects combining photography and GPS technology. I am fascinated by maps, how we imagine the world around us, how we communicated that world to others, etc.

A GPS receiver (including many smartphone apps) can record a GPS track — that is, a series of linked points recorded at regular intervals or distances as you move. Normally, these tracks are used for navigation — record where you have been so you can later retrace your route and thus find your way back home. These track files are also good for post-adventure analysis. Your can plot your speed, heading, elevation, etc. You can also use the point data in the track to geotag your photos so that you, and others, can see exactly where a particular photo was taken.

Beyond their practical uses, however, GPX tracks, when displayed as a line on a map, have an aesthetic value as well. They are a virtual mark on the land — the mark of an adventurer expressing some desire to explore. In this way they are not unlike the marks an artist makes on paper or canvas. Lines creating shapes, outlining objects, representing barriers overcome or avoided. Lines demarcating space and time. Tracings and recordings of life.

A Walk In The Park

After a long walk at Bowness Park last March, I overlaid photographs I had taken with the abstract and graphically rich tracings of my GPS tracks. Typically, one displays geo-located photos on a map — saying “this is where these photos were taken.”

But the map is not the terrain. The map is not the location.

Instead, I am displaying the map (in the form of the track overlay) on the photo. This gives the photo context. The image exists in concert with — because of — my movement across the land.

IMG_0977 TrackIMG_0985 Track
IMG_0990 TrackIMG_1008 Track

Photo Walking

The other project I started, is a series of large scale conceptual drawings. By walking a path across the land tracing the shape of a word, I am making visible some thought, some meditative idea. The word — the path — is not visible to others even though it’s creation is a very concrete act. However, by capturing the path in the form of a GPS track, I am able to share the act with others. The track image, is combined with photos taking during the walk so the viewer can experience the original event.

Winter

Winter - West

Winter - Map

Winter - East

Home

Home - Up

Home - Map

Home - Down

Leather Belt

I’ve been wanting to make some leather belts for some time now. I bought some buckles and belt blanks a while ago and had an idea of what I wanted to do with them, but never got around to it…until now.

My wife and I are season subscribers to Calgary’s premiere arts theatre, Theatre Junction. We really enjoyed a local production from a few years ago about a family stuck in a cabin surrounded by menacing dear (I’m paraphrasing here). During the performance, the person playing the deer sang a song, which basically went like this, “I am a deer, deer.”

When I bought a deer-head-shaped leather embossing stamp last year, I just knew that I would use it, in combination with the phrase “I am a deer, deer”, in the making of some belts for my wife and I.

I like the lighthearted combination of fashion and whimsy. I try not to take things too seriously. These manly leather belts are given a slight twist by the subtle irreverence of the kitschy deer head on the buckle and Dadaist text adorning the back of the waist.

Leather Moccasins

The most comfortable shoes I ever owned were a pair of tall buckskin moccasins I had when I was a kid. I would even wear them in winter. With a pair of wool socks, they were better than clunky snow boots.

This evening I finished making a pair of basic moccasins to use this winter as house shoes at our cabin. The outer is oiled leather bound with heavy lace. The insole is a thick 8 oz. piece of leather. They are quite comfy.

The best part: they are so easy to make. I know what everyone in my family is getting for Christmas this year 😉


p.s. Sorry I haven’t posted in a while. I’ve been spending all my blogging time on Tumblr. There will be more activity this winter, I promise.

Leather Bird Scares

After the first snow my wife and I went out to the cabin. When we pulled into the driveway I saw something laying on the front sidewalk, near the front door. Even from a distance I could tell that it was a large bird of some sort. It was dead. My initial hypothesis was that it hit one of the windows, fell to the ground, and roll a few centimetres. Walking about 20 meters away from the house I could see that the large two storey front entry windows reflected the brightly lit forest perfectly. The bird, flying at full speed, did not see the glass. It only saw the reflected forest. It likely died instantly.

On subsequent visits I heard birds striking the windows, but have not witnessed further casualties.

I often see bird silhouette stickers placed on large windows to prevent birds from flying into them. I thought that this might be something we should install at the cabin, but wanted something a little more aesthetically pleasing than the standard bird-scare stickers.

I made several distinctive bird owl, hawk, and harrier, silhouettes from 6 ounce leather dyed black. I only used a single coat of dye and let some of the leather show through so the shapes are not pure black. For fun/education, I stamped the species name of each bird into the leather using 1/4 inch high block letters.

I will try installing the bird silhouettes on the inside of the windows using suction cup hooks. If the bird silhouette don’t work inside the windows I will move them outside and may have to hang them from string.

We really enjoy all the birds that frequent the cabin. I’m not trying to to scare them all away. I’m just trying to keep them from hitting the windows.

Deer Axe Sheath

My sister and brother-in-law have been asking me for a while to make a sheath for their axe. The family was getting together yesterday for dinner to celebrate my sister’s birthday so I told my brother-in-law to bring over his axe so I could take a look at it.

Deer Leather StampThe axe in question is a 3 1/2 pound hardware store model with a 36 inch handle. One look and I could tell that the butt had been abused (apparently by striking it with a hammer). However, the eye was not distorted so it was not a total loss. I gave my siblings a few wood chopping hints so they can avoid damaging the head when trying to get through the large, knotted logs we tend to get in local campgrounds. The grain in the handle is far from ideal, running perpendicular to the orientation of the bit. Well, we can fit a new handle some other time.

I happened to be at Tandy Leather Factory yesterday morning and acquired a few new leather crafting tools and supplies. I decided to use my new 3D deer head stamp and oxblood-coloured dye on this sheath. A light gel antique coat over the dye really brings out the grain of the leather and the detail of the stamp.

While the sheath was drying, I took some time to clean up the axe. I peeled the ugly manufacturer’s sticker* off the handle, cleaned off the sticky residue, filed off the mushrooming edges of the butt, and sharpened the bit. Normally, when doing a full restoration, I like to strip all the paint off the head and sand down the handle, replacing any lacquer finish with linseed oil and beeswax. However, I know my siblings will appreciate something a little lower maintenance, so in this case I opted to simply re-paint the head matte black.

All-in-all the axe looks a lot better now than when it came into my shop. I hope my sister and brother-in-law are pleased with it when they see it.

My wife thought the sheath looked pretty good, but she did ask a funny question when I showed it to her, “Is’t that the axe that Marcus cut his finger with and then had to go to the hospital to get a bunch of stitches?” Yes, indeed.


* I was just ranting to my wife the other day about one of my pet peeves: stickers on products. To me, the worst thing a maker of things can do after spending precious resources designing and manufacturing a product is slap a nigh unremovable sticker on the thing before shipping to the consumer. At best, stickers slapped on the finished product are an annoyance to your customer, and what company would purposefully want to annoy its customers? At worst, a crappy sticker symbolizes the lack of pride the maker has in the product they produce and a total lack of respect for me as a consumer and human being. Even if I’m buying a plastic tub from Ikea, I want to think that the people who made it had the goal of creating the best damn tub in the world. If they slap a sticker on it, and I have to scrub, and scratch the surface to get the sticker off, then I think the manufacturer doesn’t care about the product or the fact that I have to live with it everyday.


Leather and Denim Shoulder Bag

Leather and Canvas Bags inspiration
Inspiration

I admit it. I’m addicted to tumblr. I’ve spent a lot of time on tumblr lately — time I should have been using preparing for Christmas.

I’ve been seeing a lot of canvas and leather bags in the tumblr posts by people I follow. I love the simple utility of theses bags. One day recently, I saw a variation on these leather-strapped and -bottomed bags made from what looks like an old Indian rug. It reminded me of old carpet bags. I thought this would be a great idea for a bag — recycling something old into something new.

I have a pile of old jeans waiting to be sorted and taken to the thrift store. Looking through the jeans, I thought that a denim and leather shoulder bag would be just the thing for my sister’s Christmas present. She is very pregnant right now and I figured she could use the bag as a diaper bag. That and I had no other good ideas of what to get her. With only 30 hours left until Christmas, I went to Tandy Leather Factory and bought some tan oily leather and various buckles. I did a quick sketch of my idea. It seemed straight forward enough, but I didn’t know if I could pull it off in time for Christmas.

Denim and Leather Bag sketch

The morning before Christmas day, I started my project by measuring out and cutting all the leather parts I would need. I dyed all the pieces and set them aside to dry. We were having guest over for Christmas Eve dinner, so I had to set the project aside for the remainder of the day while my wife and I cleaned the house, top-to-bottom. (Did I mention I’d had a small surgery on my foot less than 48 hours earlier, and was not supposed to be walking around too much? )Late in the evening, before going to bed, I put the finishing protective coating on all the straps.

On Christmas day, I awoke at around 6 AM. My parents were hosting Christmas dinner, but I was responsible for the pies. I went to work straight away, making my crust by hand. Once I had the two pumpkin pies in the oven I headed to the dining room (which is also my craft room) and got to work on the bag project.

Leather and Denim Bag

I selected an old favourite pair of dark blue jeans for the body of the bag. I cut off the legs and had to do a bit of work transforming the top part of the jeans into a basic bag shape. I got to work adding the leather bottom to the bag. Things started to slow down: I was running low on the thread I was using; my machine was not happy about the heavy thread, four layers of denim, and two layers of leather; and I was getting frustrated. This was the point when I almost gave up trying to get this done as a Christmas gift. However, I persevered, and the body of the bag finally came into shape. With the body complete and the straps all ready, I headed down to my shop to rivet all the pieces together. (In the summer I had splurged and bought a hand-press and dies for setting snaps and rivets — using a hammer and punch is slow and tedious. The hand-press is more efficient and consistent. Having the hand-press is the only reason the bag was done on time.)

I had the bag fully assembled and complete by 2 PM. Did I mention that I still had to wrap everyone else’s presents?

By 3pm, my wife and I were in the car heading over to my folks. After a quick hello and a little snack (I had not eaten yet) the family started tearing into the gifts.

My sister loves the bag. Apparently she had been coveting a Pendleton bag similar to the one that was my inspiration. The denim bag saves her a few bucks and she can tell everyone it was hand made by her child’s crafty uncle.

Okay, time to go check in on tumblr.

One Day

One day, years ago, a day not unlike today, with large snowflakes gently falling from a heavy grey sky, I saw a coyote. I was riding my bike along a forested trail near the river, on my way to work. The trail crossed the train tracks and I dismounted my bike to carry it across the rails. A hundred metres or so down the tracks I saw a coyote, confidently trotting towards me, lost in his thoughts. Then, it caught site of me, paused, considered its options, turned toward the woods, and dissapeared.

I live in a house near the centre of the city. Behind my house is a small matural park of long grasses, a spring, and a solitary tree. When i first move into the house, I used to hear coyotes howling and barking in the still of the night.

It’s wonderful to think that we can be so close to nature even in the centre of a city of a million people. I’d like to think that you just have to open your mind to the experience and nature will enter. Sadly, I haven’t seen a coyote in my neighborhood for several years. Did the coyotes leave, or did I simply stop looking and listening for them? I’d love to see a coyote in the city again.

Axe, Meet Sheath

I restored this axe a few weeks ago. I cleaned up the bit and attached a new handle. This very sharp and moderately heavy implement has since been leaning against the door of my office — an accident waiting to happen. Last night I started to work on a leather sheath to protect the bit (or perhaps to protect me from the bit). I’ve made a few sheaths for other axes in the past. I borrowed this design from the great sheaths that come with some of the Gränsfors Bruks axes (their axes with larger beards come with a sheath of a different design). Anyway, it was pretty straight forward and I am very happy with the result.