Leather Belt

I’ve been wanting to make some leather belts for some time now. I bought some buckles and belt blanks a while ago and had an idea of what I wanted to do with them, but never got around to it…until now.

My wife and I are season subscribers to Calgary’s premiere arts theatre, Theatre Junction. We really enjoyed a local production from a few years ago about a family stuck in a cabin surrounded by menacing dear (I’m paraphrasing here). During the performance, the person playing the deer sang a song, which basically went like this, “I am a deer, deer.”

When I bought a deer-head-shaped leather embossing stamp last year, I just knew that I would use it, in combination with the phrase “I am a deer, deer”, in the making of some belts for my wife and I.

I like the lighthearted combination of fashion and whimsy. I try not to take things too seriously. These manly leather belts are given a slight twist by the subtle irreverence of the kitschy deer head on the buckle and Dadaist text adorning the back of the waist.

Knife Making

Thorgal Aegirrson
Thorgal Aegirrson

Shortly after I started collecting axes, my wife travelled to Norway. She wasn’t prepared to pack a Scandinavian axe in her suitcase as a present on her return, so instead she brought me a Brusletto knife direct from the factory in Geilo. When I received that knife I instantly got the idea that someday I would make my own knives.

I recently expanded my knife collection with Norwegian, Swedish, and Finnish examples from Helle, Mora, and Laapin Puuko. All of the knives from each of these manufacturers is a high-quality product. The quality and finish varies depending on the amount of handwork that went into each knife (the more handmade, the better). There are a few other brands that I would like to purchase knives from (for example, Roselli of Finland), but for now I decided to make a few knives of my own.

At my wife’s recommendation I recently started reading the Thorgal saga fantasy comic series. (Yes, I have the coolest wife ever.) I took the two main characters, Thorgal and Aaricia, as the thematic inspiration for my first two knives. For both knives I used 4 1/4″ Mora laminated steel blade blanks purchased from Lee Valley. Each knife then takes visual queues from its namesake: Thorgal — hand-shaped African Rosewood handle, polished aluminum bolster, and dark-brown handmade leather sheath with contrasting thread and nickel rivets for the belt loop; Aaricia — hand-shaped maple handle finished with linseed and tung oil, brass bolster, and dark yellow handmade leather sheath with contrasting stitching and brass rivets for the belt loop. Each sheath features a hand-carved cedar blade guard insert.

Aaricia Gandalfsdotter

Each knife is a slightly different shape and incorporates features I’ve seen in various other Scandinavian knife designs. I quite enjoyed the process of shaping the handles (and it was a good excuse to get a new desktop belt/disc sander). Since the knives took shape in my hands, they feel very natural to hold and use. As nice as the commercial knives in my collection are, they were not custom made for my hand and therefore are a bit of a compromise in terms of fit, balance, and dexterity.

This project was also a good excuse to do some leatherwork. I am very happy with the sheaths for each knife. Each is as good or better quality than any of the sheaths that came with my commercial knives.

I have a few more Mora blade blanks that I will be using to make a more knives. Just looking for my inspiration right now. In the future, I would like to get a small forge set-up to make my own blades. I also want to make a crooked knife for carving canoe paddles — another project I have on the go right now.


Leather Moccasins

The most comfortable shoes I ever owned were a pair of tall buckskin moccasins I had when I was a kid. I would even wear them in winter. With a pair of wool socks, they were better than clunky snow boots.

This evening I finished making a pair of basic moccasins to use this winter as house shoes at our cabin. The outer is oiled leather bound with heavy lace. The insole is a thick 8 oz. piece of leather. They are quite comfy.

The best part: they are so easy to make. I know what everyone in my family is getting for Christmas this year 😉


p.s. Sorry I haven’t posted in a while. I’ve been spending all my blogging time on Tumblr. There will be more activity this winter, I promise.

How-to Hew Wooden Beams By Hand

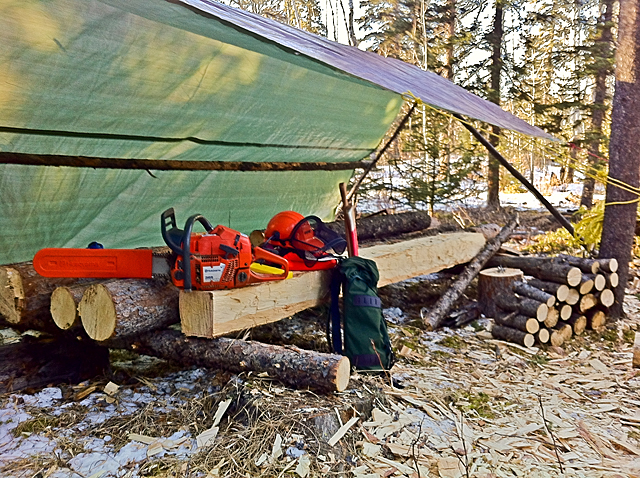
I spent several days this week at the cabin collecting logs and hewing timber for a wood shed. I did most of the hewing by hand, though I used a chain saw on one very large timber for the first step. The process of creating a square beam from a round log, by hand, is quite simple though labour intensive. As my technique improved, the work got easier. But after three days in the forest, my body knew it had done some work.

Quite often when I am working on a project I think, “Oh, this will be a good opportunity to document the process with a series of photographs.” Inevitably though, I get so involved in the work that I forget to take pictures. This week was different. The work was hard and I had to stop every hour or so for a break, drink some tea, and enjoy the surroundings. And take some pictures. So here you go, a step-by-step guide to hewing wood, if you are ever so inclined.

I’ll assume you’ve already selected a straight clear log to work on. Green wood is easier to shape than dry wood. Steady the log on a raised platform using wedges of log dogs.

Take your time and enjoy the work. As Dick Proenneke said about building his cabin in Alaska, “you can’t rush it.”

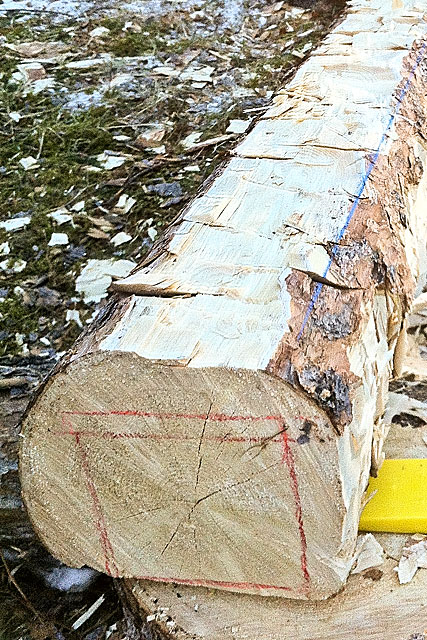
1. Layout the beam dimensions

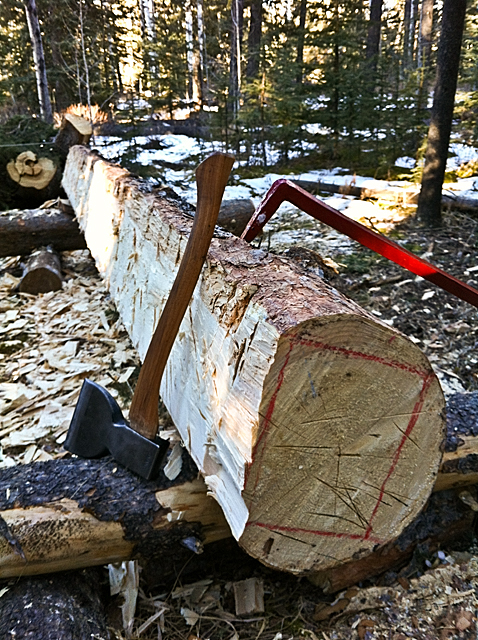
On one end of the log, layout the beam dimensions. You want the beam end centred on the tree rings. Start by marking one face plane with a level, then measure out the remainder of the faces. Repeat at the other end of the log, also making sure you start with a level reference line. Use a chalk line to mark a line from one end of the log to the other. This line shows you how much material to remove, and will be your reference in the next steps.

In the following photo, the blue chalk line is marking the plane of the right hand face of the beam. The material to the right of the line will be removed.

Hewing Wood - marking the beam dimensions

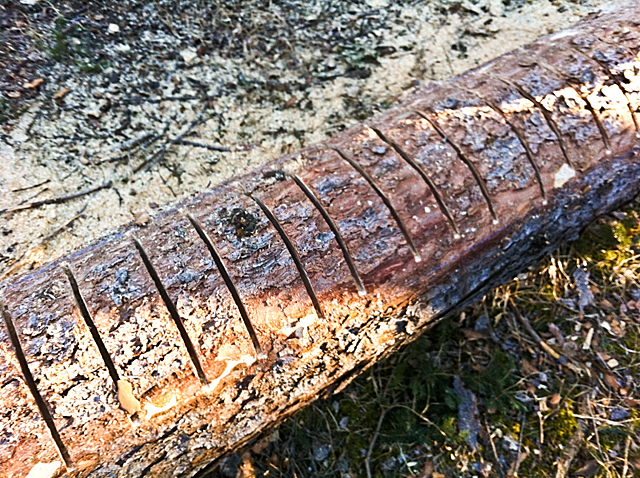
2. Score the log along one face, loosening or removing most of the waste

You will flatten each face of the beam in two steps: bulk material removal, and then fine shaping. For the bulk material removal you can use several methods.

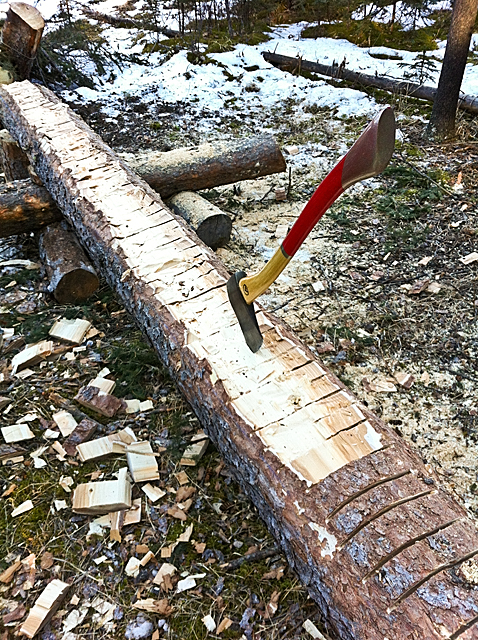
The first method is to use a large axe and chop down to within about 1/8 of an inch your chalk line. You start at the larger end of the log and, making strokes angled forty-five degrees towards the smaller end, cut a series of notches 2 to 4 inches apart. In reality, you may need to make several passes to get the depth required. You can do the scoring while standing on the log, the face you are working perpendicular to the ground, or you can do the scoring while standing on the ground, the face you are working parallel to the ground and pointing up. The former method is less work (the axe swing is longer), but the latter method requires less balance.

The second scoring method is to use a chainsaw for the first pass. Again, make a series of cuts to almost the depth of your chalk like every 2 to 4 inches down the length of the log. After scoring with the chainsaw, chop out the material between the saw kerfs using an axe, starting at the large end of the log.

I used the chainsaw-method on this 18 inch diameter log. I did not want accidental chainsaw marks on the finished beam so I was conservative in the depth I cut, and made a second pass with the axe method once the majority of the material was removed. (Click on the pictures to see larger versions. The chalk line is visible in the larger versions).

img_3282 img_3284

Hewing Wood - material removal with an axe img_3291

You may notice that I broke of one corner of the beam by accident. This is not a problem as the raw beam has some extra length. I did find however, that the corners are the fragile part, both in bulk removal step and in the next step, so take a little extra care when working these areas.

3. Finish the face with a broad axe

A broad axe is a large faced, short handled, single bevel axe. The handle should be angled towards the bevel (to the right if you are right handed) to provide clearance for your knuckles. The thumb of your forward hand should be held along the top of the handle (not wrapped around) for added clearance.

For this step, you want the face you are working on perpendicular to the ground. Ideally the log should be positioned at about waist height. (In the forest it was hard to raise the logs this high, so I worked sitting on the log and had to position the face at a slight angle as a result, as seen in the next photo.) Stand beside the log and look down the face. Start at the smaller end of the log. Use the broad axe to shave the face down to the depth of the chalk line. Keep the portion you have already smoothed in front of you, using it as a reference as you progress backwards along the log. Occasionally step back and check alignment of the face using the chalk line and end dimension marks as sighting guides.

If the scoring in step two was down to a reasonable depth, it will be quite easy to remove the remaining waste. Knots will give you the most trouble. I had to chop out a few larger ones with a felling axe.

img_3295

4. Move on to the next face

Once you have one face complete, make the chalk line for the next face and repeat until you your round log is a rectangular beam.

Once the beam is complete, you can further smooth the surface with an adze. This will give you a gently undulating surface and remove the majority of the axe marks. For an even smoother finish, you can plane all the faces that will be visible in your final project.

img_3310

img_3316

Leather Bird Scares

After the first snow my wife and I went out to the cabin. When we pulled into the driveway I saw something laying on the front sidewalk, near the front door. Even from a distance I could tell that it was a large bird of some sort. It was dead. My initial hypothesis was that it hit one of the windows, fell to the ground, and roll a few centimetres. Walking about 20 meters away from the house I could see that the large two storey front entry windows reflected the brightly lit forest perfectly. The bird, flying at full speed, did not see the glass. It only saw the reflected forest. It likely died instantly.

On subsequent visits I heard birds striking the windows, but have not witnessed further casualties.

I often see bird silhouette stickers placed on large windows to prevent birds from flying into them. I thought that this might be something we should install at the cabin, but wanted something a little more aesthetically pleasing than the standard bird-scare stickers.

I made several distinctive bird owl, hawk, and harrier, silhouettes from 6 ounce leather dyed black. I only used a single coat of dye and let some of the leather show through so the shapes are not pure black. For fun/education, I stamped the species name of each bird into the leather using 1/4 inch high block letters.

I will try installing the bird silhouettes on the inside of the windows using suction cup hooks. If the bird silhouette don’t work inside the windows I will move them outside and may have to hang them from string.

We really enjoy all the birds that frequent the cabin. I’m not trying to to scare them all away. I’m just trying to keep them from hitting the windows.

Deer Axe Sheath

My sister and brother-in-law have been asking me for a while to make a sheath for their axe. The family was getting together yesterday for dinner to celebrate my sister’s birthday so I told my brother-in-law to bring over his axe so I could take a look at it.

Deer Leather StampThe axe in question is a 3 1/2 pound hardware store model with a 36 inch handle. One look and I could tell that the butt had been abused (apparently by striking it with a hammer). However, the eye was not distorted so it was not a total loss. I gave my siblings a few wood chopping hints so they can avoid damaging the head when trying to get through the large, knotted logs we tend to get in local campgrounds. The grain in the handle is far from ideal, running perpendicular to the orientation of the bit. Well, we can fit a new handle some other time.

I happened to be at Tandy Leather Factory yesterday morning and acquired a few new leather crafting tools and supplies. I decided to use my new 3D deer head stamp and oxblood-coloured dye on this sheath. A light gel antique coat over the dye really brings out the grain of the leather and the detail of the stamp.

While the sheath was drying, I took some time to clean up the axe. I peeled the ugly manufacturer’s sticker* off the handle, cleaned off the sticky residue, filed off the mushrooming edges of the butt, and sharpened the bit. Normally, when doing a full restoration, I like to strip all the paint off the head and sand down the handle, replacing any lacquer finish with linseed oil and beeswax. However, I know my siblings will appreciate something a little lower maintenance, so in this case I opted to simply re-paint the head matte black.

All-in-all the axe looks a lot better now than when it came into my shop. I hope my sister and brother-in-law are pleased with it when they see it.

My wife thought the sheath looked pretty good, but she did ask a funny question when I showed it to her, “Is’t that the axe that Marcus cut his finger with and then had to go to the hospital to get a bunch of stitches?” Yes, indeed.


* I was just ranting to my wife the other day about one of my pet peeves: stickers on products. To me, the worst thing a maker of things can do after spending precious resources designing and manufacturing a product is slap a nigh unremovable sticker on the thing before shipping to the consumer. At best, stickers slapped on the finished product are an annoyance to your customer, and what company would purposefully want to annoy its customers? At worst, a crappy sticker symbolizes the lack of pride the maker has in the product they produce and a total lack of respect for me as a consumer and human being. Even if I’m buying a plastic tub from Ikea, I want to think that the people who made it had the goal of creating the best damn tub in the world. If they slap a sticker on it, and I have to scrub, and scratch the surface to get the sticker off, then I think the manufacturer doesn’t care about the product or the fact that I have to live with it everyday.


Three Old Bags

The title of this post is not meant as a euphimism. Quite by accident I have started a collection of old backpacks. For Christmas, my father gave me one of his old canvas and leather backpacks (with felt shoulder strap padding!). I decided to document some of my vintage backpacks here.

MEC Klettersack 40th Anniversary Edition

Okay, this is not actually an old bag. It’s a new bag in a retro design celebrating the 40th Anniversary of Canada’s member-owned outdoor equipment cooperative — Mountain Equipment Coop. I have fond memories of visiting MEC’s second Calgary location as a young child with my father. By the time I was in junior high I was riding my mountain bike downtown the MEC’s third-location when I wasn’t yet old enough to own my own member share and had to use my mom’s member number. I still have the MEC backpacks I used in junior high and high school (the latter is ’90s stylish in green and purple with fluorescent yellow 3M reflective stripes I added myself). For their 40th anniversary, MEC created this retro-styled Klettersack complete with leather attachment points. I love the simplicity of this bag. No bells and whistles.

MEC Klettersack 4th Anniversary Edition label

Lafuma Rucksack

This is the bag my father gave me for Christmas. He says he got it in the early ’70s but’s materials and styling make me think more of the early ’60s. It is in mint condition. It is not for sale. If you have something similar, I’d love to hear more about it.

Dad, maybe next year you can give me your light blue canvas backpack (the one with the rubber bottom that we used to take cragging at Wasootch Slabs). I’d really appreciate it. Thanks.

Lafuma Rucksack Lafuma Rucksack label

Great Pacific Iron Works Ultima Thule Backpack

Great Pacific Iron Works was a spin-off Yvonne Chouinard’s Chouinard Equipment, the proginator of Black Diamond Equipment, and later, Patagonia. I’m not sure of the provinence of this particular frameless backpack. I found it last summer, laying in the alley behind my home. Other than a small tear it is in great shape, though it has taken on that wonderful vintage polyurethane smell (which is nice if you are into that sort of thing). I found a photo of it in a 1975 Great Pacific Iron Works catalog. I’m not sure how long the GPIW brand was in existence, but I’d say this pack can’t me much newer than that. In other words, it is only slightly younger than I am.

Great Pacific Iron Works Ultima Thule Backpack label

Leather and Denim Shoulder Bag

Leather and Canvas Bags inspiration
Inspiration

I admit it. I’m addicted to tumblr. I’ve spent a lot of time on tumblr lately — time I should have been using preparing for Christmas.

I’ve been seeing a lot of canvas and leather bags in the tumblr posts by people I follow. I love the simple utility of theses bags. One day recently, I saw a variation on these leather-strapped and -bottomed bags made from what looks like an old Indian rug. It reminded me of old carpet bags. I thought this would be a great idea for a bag — recycling something old into something new.

I have a pile of old jeans waiting to be sorted and taken to the thrift store. Looking through the jeans, I thought that a denim and leather shoulder bag would be just the thing for my sister’s Christmas present. She is very pregnant right now and I figured she could use the bag as a diaper bag. That and I had no other good ideas of what to get her. With only 30 hours left until Christmas, I went to Tandy Leather Factory and bought some tan oily leather and various buckles. I did a quick sketch of my idea. It seemed straight forward enough, but I didn’t know if I could pull it off in time for Christmas.

Denim and Leather Bag sketch

The morning before Christmas day, I started my project by measuring out and cutting all the leather parts I would need. I dyed all the pieces and set them aside to dry. We were having guest over for Christmas Eve dinner, so I had to set the project aside for the remainder of the day while my wife and I cleaned the house, top-to-bottom. (Did I mention I’d had a small surgery on my foot less than 48 hours earlier, and was not supposed to be walking around too much? )Late in the evening, before going to bed, I put the finishing protective coating on all the straps.

On Christmas day, I awoke at around 6 AM. My parents were hosting Christmas dinner, but I was responsible for the pies. I went to work straight away, making my crust by hand. Once I had the two pumpkin pies in the oven I headed to the dining room (which is also my craft room) and got to work on the bag project.

Leather and Denim Bag

I selected an old favourite pair of dark blue jeans for the body of the bag. I cut off the legs and had to do a bit of work transforming the top part of the jeans into a basic bag shape. I got to work adding the leather bottom to the bag. Things started to slow down: I was running low on the thread I was using; my machine was not happy about the heavy thread, four layers of denim, and two layers of leather; and I was getting frustrated. This was the point when I almost gave up trying to get this done as a Christmas gift. However, I persevered, and the body of the bag finally came into shape. With the body complete and the straps all ready, I headed down to my shop to rivet all the pieces together. (In the summer I had splurged and bought a hand-press and dies for setting snaps and rivets — using a hammer and punch is slow and tedious. The hand-press is more efficient and consistent. Having the hand-press is the only reason the bag was done on time.)

I had the bag fully assembled and complete by 2 PM. Did I mention that I still had to wrap everyone else’s presents?

By 3pm, my wife and I were in the car heading over to my folks. After a quick hello and a little snack (I had not eaten yet) the family started tearing into the gifts.

My sister loves the bag. Apparently she had been coveting a Pendleton bag similar to the one that was my inspiration. The denim bag saves her a few bucks and she can tell everyone it was hand made by her child’s crafty uncle.

Okay, time to go check in on tumblr.

The Complete How-to Book of Indiancraft

My grandfather gave me this book when I was 10 years old. He was a true mountain man and loved collecting and restoring old rifles. His home was the ultimate young boy’s playground.

Book-Cover-Indiancraft

Book-Cover-Indiancraft-dedication

I can’t watch Jeff Bridges in True Grit without thinking of my grandfather – the physical and vocal resemblance is uncanny. This drawing by my aunt gives you the idea (my grandfather was a welder).

Carl-Stoddard-Welding-by-Carol-BarberTrue Grit Movie Poster

Peterson Sherlock Holmes Pipe Tamper

I got this nifty pewter pipe tamper recently. It is made by Peterson Pipes, of Dublin, and the top is crowned with the bust of the world’s first Independent Consulting Detective, Mr. of Sherlock Holmes (formerly of 221B Baker Street, London). I’ve always been a fan of Sherlock Holmes, and to me, he is one of the prototypical pipe smokers. In this rendition he is wearing the stereotypical deerstalker and sporting a calabash, though neither of these accessories were used to great extent in the original stories. This is image of Holmes comes from the stage, where an exaggerated pipe shape was required to convey pipe-ness to the theatre audience. I have not yet decided which of my pipes I will be pairing this tamper with. I have a meerschaum calabash on order that might work nicely.