When I made the shift to the EOS M-series of cameras I did so knowing I would adapt my existing (and often quite large) Canon EF lenses to the diminutive mirrorless APS-C sensor bodies. That has worked out fine for the most part and I’ve made many successful photographs with these adapted optics. Even the Tamron 150-600mm, which I have never even used in an EF amount body, has worked out quite well on the larger EOS M5.
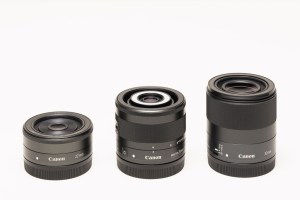
The native Canon EF-M lenses were, for many years, highly underrated. The photographic community loved (and still loves) to disparage the tiny quantity of native EF-M lenses Canon has released. It’s fair to say that Canon could have done better than 8 lenses in 7 years, but the lenses they have released are all quite good, some optically class leading, especially given their tiny size. I also appreciate the consistent understated aesthetic Canon has used with these lenses.
Would it be nice to have a few more fast primes? Sure, but personally I do not feel limited by the current selection. The 22mm ƒ/2.0 pancake is fast enough for indoor work, though it could be sharper. A fast 15mm (24 equivalent) would also be handy for those who like something wider. On the long end, would a 54mm ƒ/1.4 (85mm equivalent) make a nice portrait lens? Sure, but I don’t really see M-series cameras being used for serious portraiture. At the moment, the fast 32mm ƒ/1.4 is a tack-sharp and versatile allrounder—good for portraits, low-light, and street photography—one of my favourite lenses ever.
You could argue that three fast fixed aperture zooms—wide-angle, standard, and telephoto—are missing from the EF-M line-up. Again, I would love to see these lenses made, but I’m not sure the target market would want the larger sizes and higher prices that these lenses would entail.
In mid-2023, Canon quietly discontinued the EOS M series and with it the EF-M mount from their line-up. The discontinuation was not really a suprise, but it was still dissapointing. In certain regions, the EOS M series was very popular, and it is going to be very hard to replace this compact and high-quality system within the context of the physically larger RF-mount ecosystem. RIP EOS M.
I purchased my first EF mount lens1, the original blackCanon EF 80-200 ƒ/2.8 L “magic drainpipe” in the early 1990s. That lens is a tank and still going strong. Several other lenses from the film era did not fair as well and have been retired to the gear-closet in the sky.
I’ve actually never owned a full-frame DSLR, but ironically I’ve also never owned any cropped-sensor specific EF-S mount lenses either. I know some Canon EF-S lenses are excellent value, but I guess I just never wanted to paint myself into a corner—the dream of owning a full-frame sensor body persists.2
Canon EF Prime Lenses
Canon EF 50mm ƒ/1.8 (mount sheared off, glued, broke again)
Photographic lenses shape the light that we record with photographic film or digital sensors. They range in construction from cheap plastic toys to modern glass marvels of optical science, and vary in price from hundreds to thousands of dollars. While better lenses result in objectively better recordings of light, photography is an art as well as a science and sometimes a photographer’s vision is better captured by a slightly inferior lens with more character.
My choice in lenses has often been dictated by a certain amount of pragmatism. I don’t mind spending money on quality technology, but I also balance desire with the reality that for most of my photographic career I have simply been an amateur enthusiast. I’ve had the pleasure of owning several top of the line professional instruments, but I’ve also immensely enjoyed many cheaper, more compromising lenses (often with barely noticeable differences in image quality).
I’ve generally avoided using third-party lenses. While often less expensive than native lenses, that savings used to come at the cost of quality. Now third-party lenses from Tamron and Sigma are first rate, but one still has to worry about compatibility issues with new camera bodies. Native lenses largely avoid such problems and just work.
Most of my photography is landscape, nature, or architecture. Sports and people are rare subjects. As such I have always tended to prefer a wide-angle field of view, with the occasional long telephoto lens session done for variety.
The Canon EF-M 32mm ƒ/1.4 STM (released 2018) is Canon’s fastest lens for EOS M-series cameras and only their third prime for the system. It is also arguable the sharpest EF-M mount lens.
This lens initially flew under the radar as it was quietly announced the same day as the EOS R, Canon’s inaugural (and controversial) full-frame mirrorless camera body.
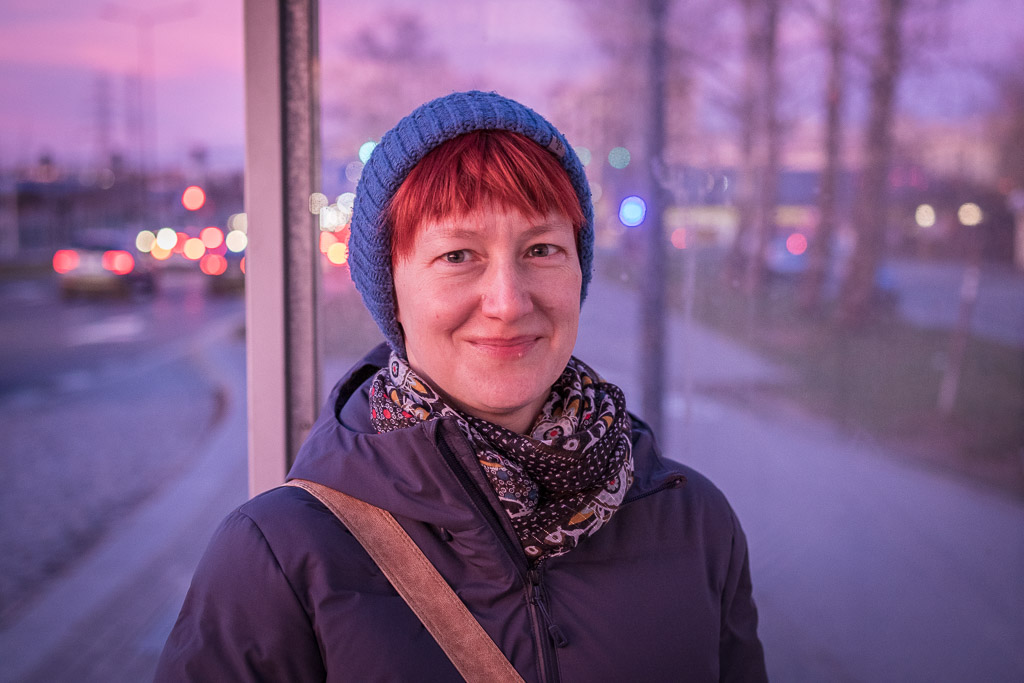
In late 2019 my sister-in-law was due to have a baby and my wife was going back home to Poland to help out. I was going along, but would be on my own for much of the month, so I planned to take my EOS M5 along to pass the time. At the last minute I decided to buy and take the Canon EF-M 32mm ƒ/1.4 STM as I knew I would be called upon to take pictures of the new baby. This decision turned out to be very worth it as I also spent many days walking around the city and the forest with this lens.
A 50mm equivalent lens is not the focal length I normally gravitate towards, but a fast and sharp prime is always a joy to use. Using a fixed and unfamiliar focal length is also a very good creative challenge, forcing one to see and compose differently.
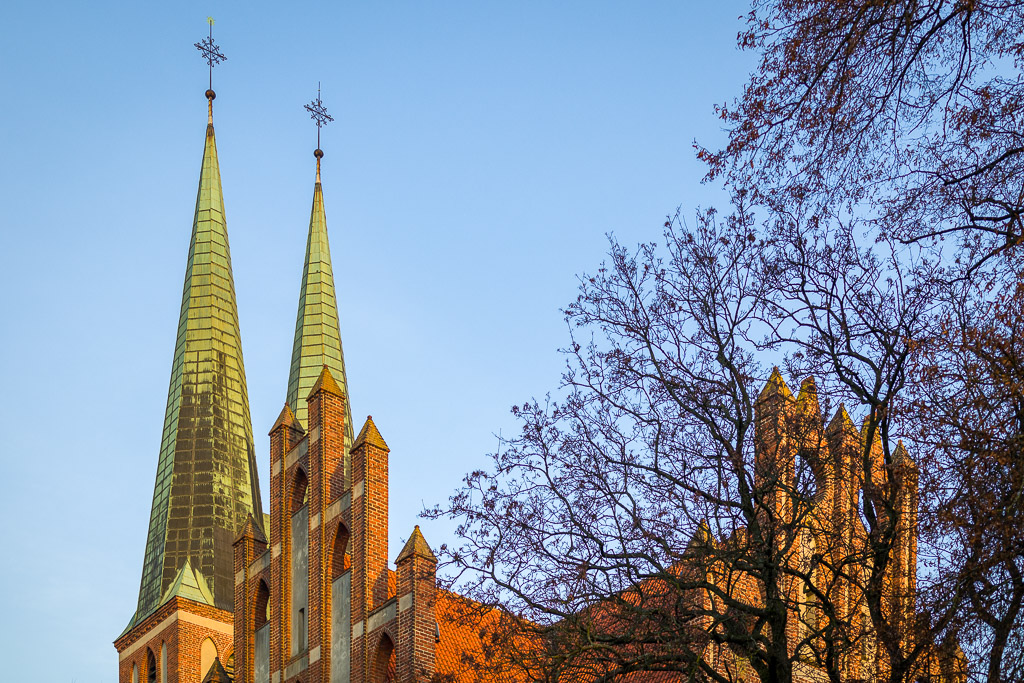
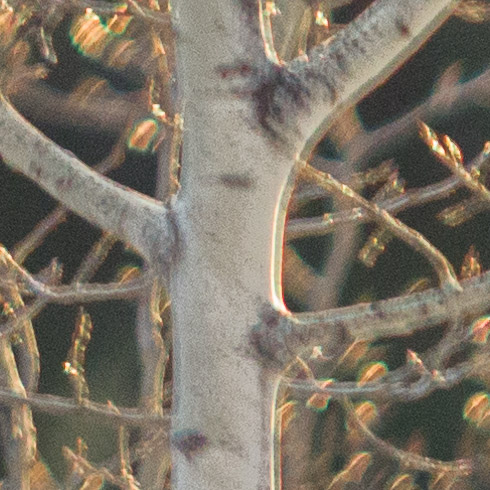
The one issue I have with this lens (which is a common problem with many fast primes) is fairly strong lateral chromatic aberration. The resulting purple and green fringing can be corrected, but unfortunately the built-in Adobe Lightroom lens profile is woefully inadequate in this respect and I often have to spend a lot of time applying manual lens corrections.
This is one of two Canon EF-M lenses to date that lack optical image stabilization (the other being the Canon EF-M 22mm ƒ/2 STM). The omission of stabilization is understandable as it would make an already bulky lens (in EF-M terms) even bulkier, and the fast aperture reduces the need for stabilization when shooting stills.
In mid-2019, Sigma announced a trio of fast primes (16mm, 30mm, 56mm) for the EF-M mount. The SIGMA 30mm F1.4 DC DN is a much cheaper (though not as sharp) alternative to the Canon EF-M 32mm ƒ/1.4 STM. The price difference is even greater if you consider that Canon sells their ES-60 lens hood as a $40 USD optional accessory.
I am sure opinions vary about the merits of using protection filters (UV/haze filters) on photography lenses. Back in the film era UV/haze filters were used to cut out a spectrum of light that was invisible to the human eye, but would register on the film and decrease contrast or sharpness slightly. Digital sensors have UV filters pre-installed, so with digital cameras these clear add-on lens filters, now more commonly called protection filters, are simply a piece of glass that keeps water, oil, dust, and scratches from marring the front element of the lens.
Lens designers go to great lengths to design an optical system that is as sharp and as free as possible from optical aberrations (given the target retail price of the lens… and physics). So what happens when you stick a $50 (or $250) piece of glass in front of that $1500 lens? Well, at the very least, it won’t improve the quality of the image. In the worst case, that (not-so-cheap) protection filter might actually make your images look worse than if you just let your lens glass get covered in dust and fingerprints. Don’t believe me? Check out the following example.
I acquired my Canon EF 80-200 f/2.8L sometime before the advent of the internet (1993-ish), which makes me feel old. This lens was released in 1989 and a pretty phenomenal piece of glass at the time. It was replaced in 1995 by the EF 70-200 f/2.8L USM which is still produced and sold today.
As a high-school student, I probably spent every last penny acquiring this professional-quality fast zoom lens, so when it came time to put on a protection filter I didn’t get the most expensive option. I bought a Heliopan filter that probably doesn’t have any anti-reflective coatings. It says “Made in Germany” though, so it must be good, right?
I spent the 1990s shooting sports and outdoor adventures with the 80-200mm lens so I was always glad to have the protection filter in place. And, honestly, any issues with the protection filter may not have been apparent on film with its much lower effective resolution when compared to my current 24 megapixel Canon EOS M5. When I started shooting digital, in the early 2000s, the 80-200mm was starting to feel old, so it mostly just sat in a spare camera bag. I “replaced” it with a the Canon EF 70-300mm f/4-5.6 IS USM, which is lighter, more compact, has more reach, and is image stabilized (I always missed the 80-200mm’s fast aperture and solid build quality though). Later, I replaced/supplemented all my EF lenses with EF-M lenses.
In The Field
I recently purchases a wide-angle L-series zoom and became nostalgic about the 80-200mm red stripe lens (the “Magic Drainpipe” as it is affectionately called, and which still sells used for $500 to $700). I took the telephoto zoom out with me shooting in the foothills during “golden hour” one evening and I was shocked. I thought there was something wrong with me. I was using a shutter speed of 1/400 second, and the images looked motion-blurred when reviewing them in my M5 electronic viewfinder. Okay, maybe 1/(2xfocal-length) is not a fast enough shutter speed on a crop-sensor body when handholding a heavy lens. I increased the shutter speed to 1/800 second and then 1/1000 second, cranking up the ISO along the way (gotta love modern sensors). Nothing improved. I put the camera on a monopod. The images looked the same. I thought maybe I was seeing things and decided to check the images in more detail back home on the computer at 1:1.
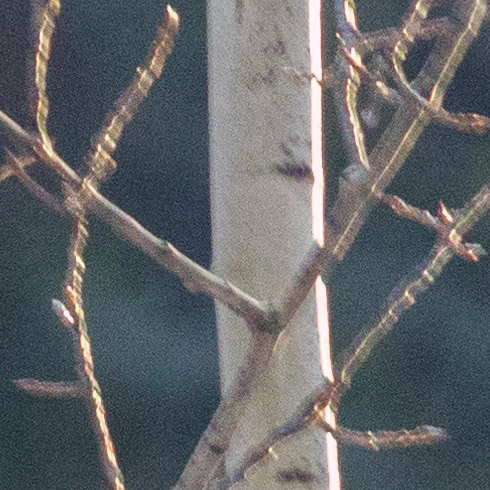
Back at the computer, sure enough, all the images were affected with what looked like camera-shake induced motion blur. I started to suspect that the 25 year-old filter I always had mounted on the lens might be the culprit. I wanted to eliminate it as a variable anyway, so I shot some test images with and without the filter in place. Bingo! The unfiltered images are tack sharp. (All samples shown are 1:1 pixel crops, but may display at reduced sized depending on your browser.)
Canon EF 80-200mm f/2.8L @ 200mm f/2.8 1/640sec ISO1000, Heliopan S 72
Canon EF 80-200mm f/2.8L @ 200mm f/8 1/500sec ISO1000, No Filter
The filter is introducing a strong amount of astigmatism. The filtered images are blurry in one direction, but relatively sharp in the perpendicular direction. Odd, don’t you think, for a supposedly flat piece of glass?
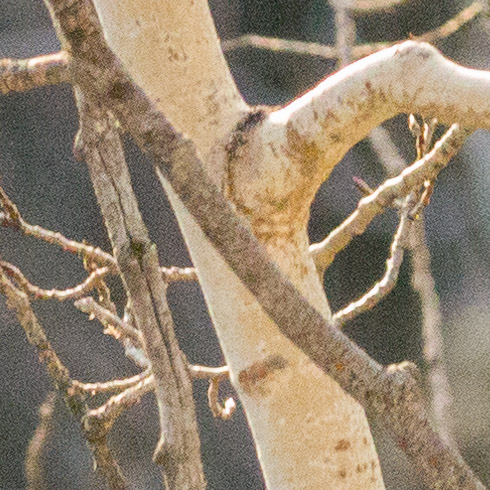
The 80-200mm is an old lens, but I still would like to keep a filter on to protect the front element. I’m having fun shooting with it and don’t want to hesitate to take it out with me. So, I bought a new filter: a Hoya Fusion Antistatic Super Multi Coating (SMC) protector. This is the series of filters I have been using lately, for both protectors and circular polarizers. They are decently priced and well rated.
Canon EF 80-200mm f/2.8L @ 200mm f/5.6 1/400sec ISO2500, Heliopan S 72
Canon EF 80-200mm f/2.8L @ 200mm f/5.6 1/640sec ISO4000, No Filter
In The Lab
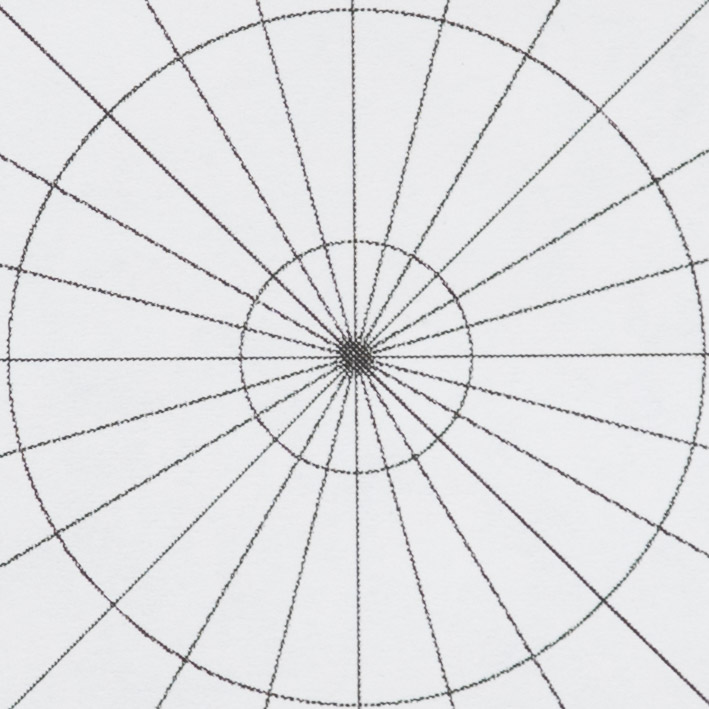
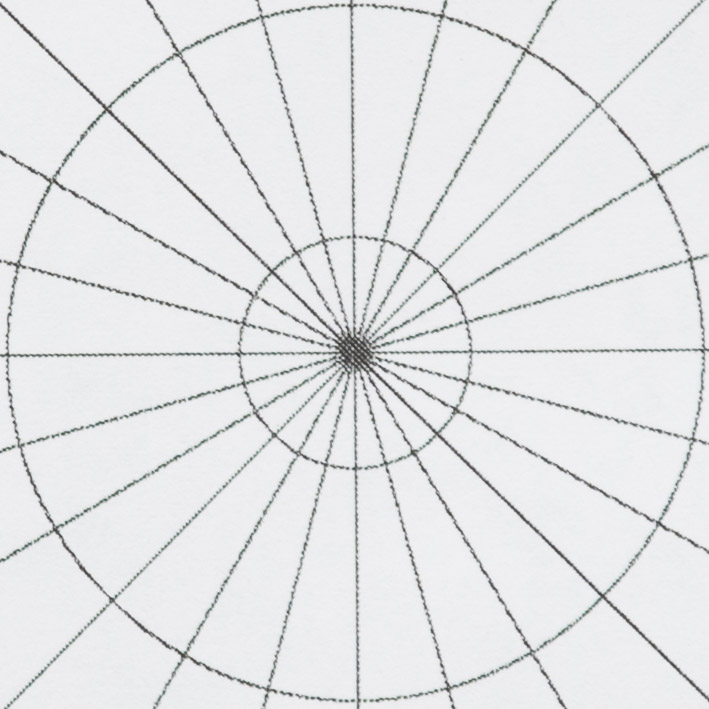
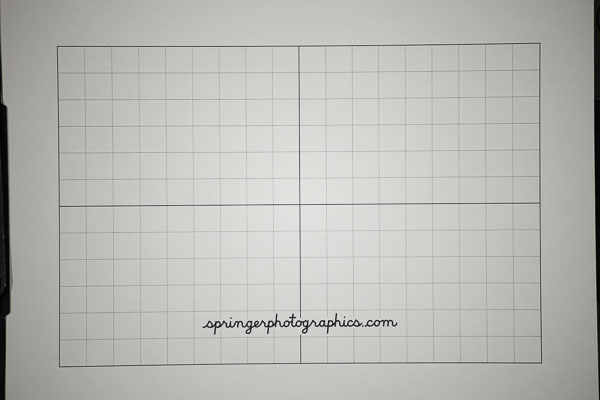
I shot a controlled comparison through the EF 80-200mm f/2.8L without a filter, with the problematic old Heliopan UV, and with the Hoya Fusion Antistatic SMC protector. I first shot with the bare lens at every full aperture stop to find the sharpest native aperture for this lens. The aperture of f/5.6 is the winner. Then I shot at f/5.6 with each of the filters. The image from the lens without any filters is obviously the sharpest. The Hoya image is almost as sharp, but with a little bit more chromatic aberration showing. The Heliopan images is, well, just gross.
(The target is something I drew in Illustrator, printed on a not-high-quality laser printer, taped outside my bedroom window, and photographed on a cold and cloudy day. Not laboratory quality, but it does the trick.)
Canon EF 80-200mm f/2.8L @ 200mm f/5.6, Heliopan S 72mm
To UV or Not To UV
So, should you use a protection filter on your lens? It’s not an easy question to answer. For some lenses, the risk of damage, cost of repair, irreplaceability, or prospect of incessant cleaning, are good reasons to use a filter. In other cases, you might not want to degrade the image quality.
Buying filters is a bit of an art. A $250 filter may or may not be better than a $50 filter, but buying from the bargain bin is a sure route to disappointment as is buying from a questionable eBay seller. As a rule, I steer clear of really expense filters. I’ve heard too many stories of people getting absolutely fleeced with super expensive filters that just don’t deliver what they promise. Additionally, every other month a manufacturer comes out with a new filter series featuring some whizzbang feature. Is this feature beneficial to your photography? And is it worth the price?
Here is my policy in regards to protection filters…
For a lens under $600 dollars, I don’t bother. This usually means a lens with a fairly small front piece of glass that is not as exposed to the elements or potential damage. In the unlikely event that the lens gets wrecked I will just replace it or take the opportunity to upgrade. Most EF-M lenses fit into this category: they are great lenses, but easily replaced.
For a lens between $600 and $800, I make a judgment call. If the lens is not likely to be used in a destructive setting and/or I want to maximize the image quality (a portrait lens, for example) I will forego a filter.
For a lens costing over $800, I add a protection filter. I try to read technical reviews before choosing a filter, and will always buy a multi-coated filter. Other features are nice to have if they don’t add too much cost. The Hoya Antistatic filters have been great, and probably attract less dust. Maybe. I also try to maximize my quality per dollar. I’m not making money from my photography at the moment, but I also believe there is no point in owning a state-of-the-art $1700 professional camera lens only to hamper it with a $15 subpar pane of glass.
If I am shooting in a controlled environment I might take a filter off for a short period to maximize image quality.
That’s about it. I have a few other policies that, in practice, supplement or obviate the use of a protection filter.
I use a lens hood on every lens, all the time. A hood not only keeps stray light from refracting off the lens surface and causing flare, but is a great first defence for keeping rain, snow, kid fingers, photographer fingers, dust, rocks, branches, door knobs, the ground, and anything else from touching the front lens element.
In storage I keep each lens in a camera bag or in a lens pouch and plastic bin.
I keep the lens cap on unless I am actively shooting. If the the lens hood is nice and deep, I will occasionally walk around with the lens cap off (for example, if I am walking for less than two minutes between outdoor shooting locations). But if the lens is really wide and the petal hood not very good protection I will put the lens cap on every time I lower the camera (especially if no protection filter is in place). Setting the camera on the kitchen table, I put the lens cap on. Laying the camera on the seat of the car, I put the lens cap on. Putting the camera back into the camera bag, I put the lens cap on. Get the idea?
In 30 years taking photos I have never damaged a front lens element, knock on wood. I’ve dropped a lens into the ocean (it died), driven over one with a van (the lens and the van survived), and sheared the mount off several plastic lenses (a bit of Crazy Glue does the trick for a little while). I hate cleaning lenses so I try very, very, very hard to keep them free of dust, water spots, and finger prints. I would rather clean a protection filter which is flat and relatively disposable than an irreplaceable large curved lens element.
The arguments for or against protection filters can reach a religious fervour. I choose to be pragmatic. Roger Cicala at LensRentals tries to be scientific about these things and recently posted another example of a bad protection filter messing up an otherwise good lens. Its worth a read.
What’s Next?
Since I had a target set up and the tripod out, I got out every lens I use regularly (10 lenses, if you must know), mounted each on the camera, and shot a series of images at every full aperture (and at both the wide and long end of each zoom lens). It is good to know the sharpest aperture for each lens. In many cases the results are as I expected, but there are also some amazing surprises. I’ll try to post those results when I have time to generate the 120 1:1 crop thumbnails.
At the beginning of April the prairie crocuses (Anemone patens) began to emerge on the grassy slopes of the natural park near my home (in fact, the day after one of many big spring snowstorms). We are about a month behind our European cousins, who have been enjoying snowdrops (Galanthus nivalis) since the beginning of March and where true crocuses (Crocus) are basically now done blooming. The prairie crocuses are about three weeks later this year than last. Spring is also quite late. (I’m writing this on April 25, and though the grass has started to green… it is snowing again.)
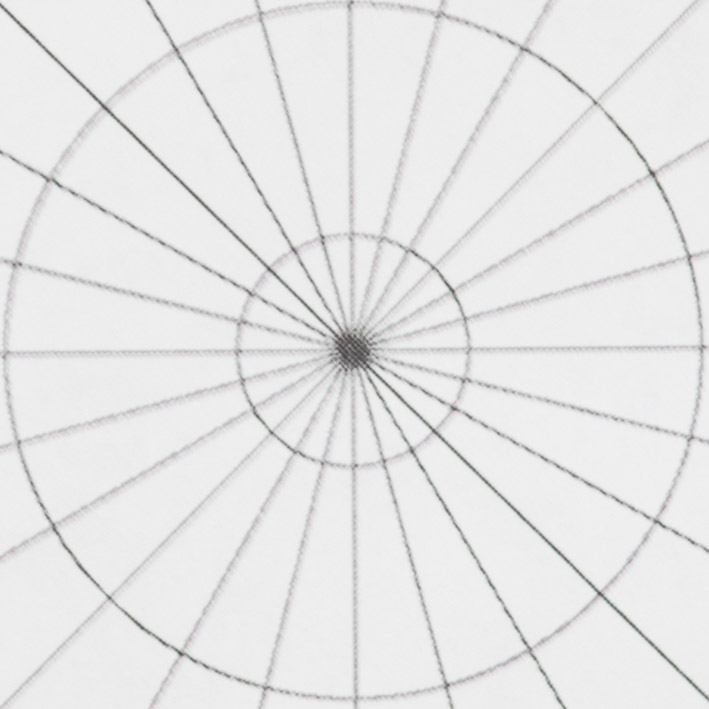
I’ve been going out every day to photography these violet-coloured, furry, miniature parabolic sun-tracking antennae. Inadvertently, each time I’ve gone out, I’ve taken a different lens mounted on my Canon EOS M5. Though I am primarily a wide-angle photographer, I like to experiment and enjoy working with a range of unique lenses.
I thought I would put together a little gallery of prairie crocus photographs taken with various lenses to show that you can shoot close-ups and macros1 with just about any lens.
Definitions
This isn’t meant to be a full macro tutorial, but a few definitions might help so we are speaking the same language.
Maximum Magnification
Magnification is measured as the difference between the subject size and the size of the image projected on the sensor plane. It can be expressed as a decimal multiplier (0.5x) or a ratio (1:2). For example at 0.25x (or 1:4) a 40mm high subject would appear as 10mm high at the sensor, or one quarter life-size. 0.25×40=10 or 40*(1/4)=10.
The magnification is expressed in terms of the sensor format for which the lens is designed. When using full-frame lenses on a smaller sensor camera the magnification capability is increased by the crop factor. For example, a 0.5x capable full frame lens will have a maximum magnification of 0.8x on APS-C (0.5×1.6=0.8). Yeah!
With a smaller focal length lens the working distance is usually smaller, making lighting of the subject more difficult and increasing the potential to scare away moving subjects (e.g., bugs).
Flange Distance
For interchangeable lens cameras (ILCs), the distance from the front surface of the lens mount to the film/sensor plane.
Canon EF-M Flange Distance = 18mm
Canon EF Flange Distance = 44mm (including using EF lenses on the EF-to-M adaptor)
Lens Length
The distance from the camera lens mount surface to the front of the lens (without hood attached).
Loss of Light
Macro lenses usually have a fairly fast wide aperture (f/2.8 of less), to compensate for the loss of light (reduction in the effective aperture) as the lens focuses on closer subjects. Remember, f-stop is a ratio of the aperture diameter to the focal length. As you focus closer, the lens mechanism effectively increases in focal length, reducing the f-stop ratio, and reducing the amount of light reaching the sensor — perhaps 2 stops at 1:1 magnification. Thus if you used an incident meter to measure scene brightness, and set your camera exposure accordingly, your image would be underexposed when shot close-up.
Sensor Plane/Film Plane/Focal Plane
The flat surface of the digital sensor or film. On many cameras the location of the sensor plane is indicated on the exterior of the camera with a small circle bisected by a horizontal line: Φ. Focusing distance is measured from the film plane, not the front of the lens.
Crop Factor
The difference between the size of a full frame sensor compared to a smaller sensor. For Canon APS-C this is 36mm (full-frame sensor width) divided by 22.2mm (APS-C sensor width) which equals approximately 1.6 crop factor.
Wide Angle Lenses
Lenses that expand space and capture a wide field of view.
I’ve always been a wide-angle photographer. A few years ago, when I got my EF-M 11-22mm I was really keen on attempting wide-angle macros or environmental close-ups. Similar to environmental portraits, where a person is shown in an environment for context, I wanted to showcase the surroundings in my macros and close-ups to give viewers a better sense of the environment in which the subject exists.
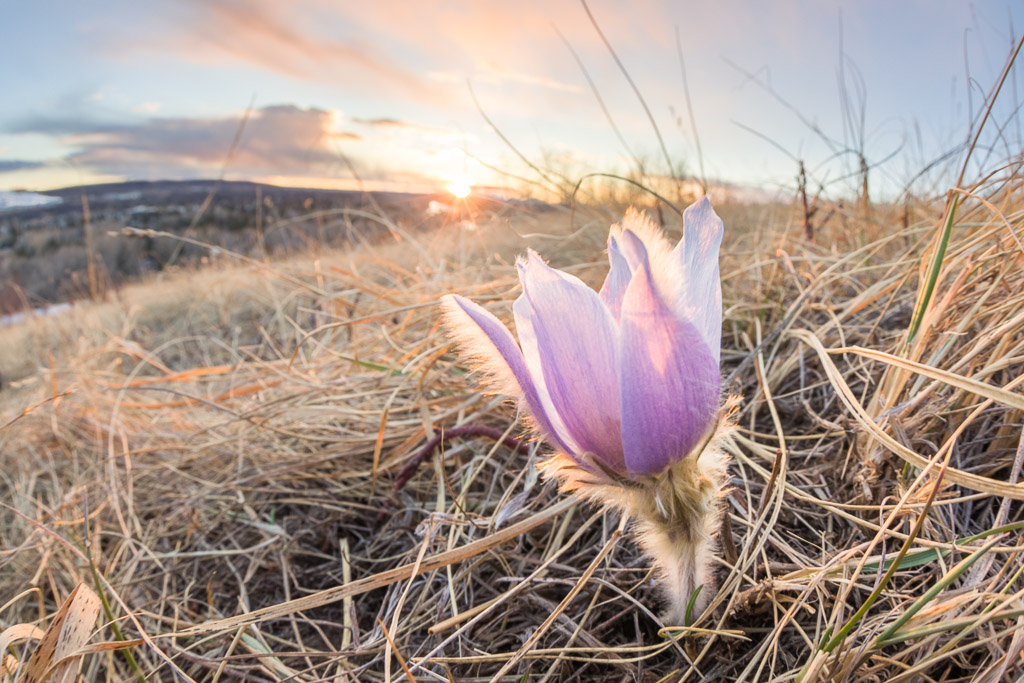
Canon EF 8-15mm f/4L Fisheye USM
I’ll start with the widest lens in my arsenal, though it is not the first, second, or even third, lens I used to photograph the prairie crocuses. It does have an amazing minimum focusing distance though, and the ultra-wide angle makes it easy to include background elements in the frame.
I love how compact and wide this lens is. It reminds me of shooting with my original 16-35mm on my old film bodies (I’ve have yet to own a full frame DSLR — yet). However, at 2x zoom it doesn’t cover a lot of range. It’s great as a specialized landscape lens, or for shooting interiors though.
The 16-35mm f/4 is my most recent lens purchase, my favourite lens at the moment, and replaces my venerable but old Canon EF 16-35mm f/2.8L USM. For me, it is a very versatile lens, shooting indoors and outdoors, landscapes and my fast and crazy toddler, all equally well.
Maximum Magnification (x) 0.23 (on FF at 35mm)
Closest Focusing Distance (m) 0.28
Length (mm) 112.8mm
Length to film plane (EF-M) 156.8mm
Working distance at Maximum Magnification 12cm
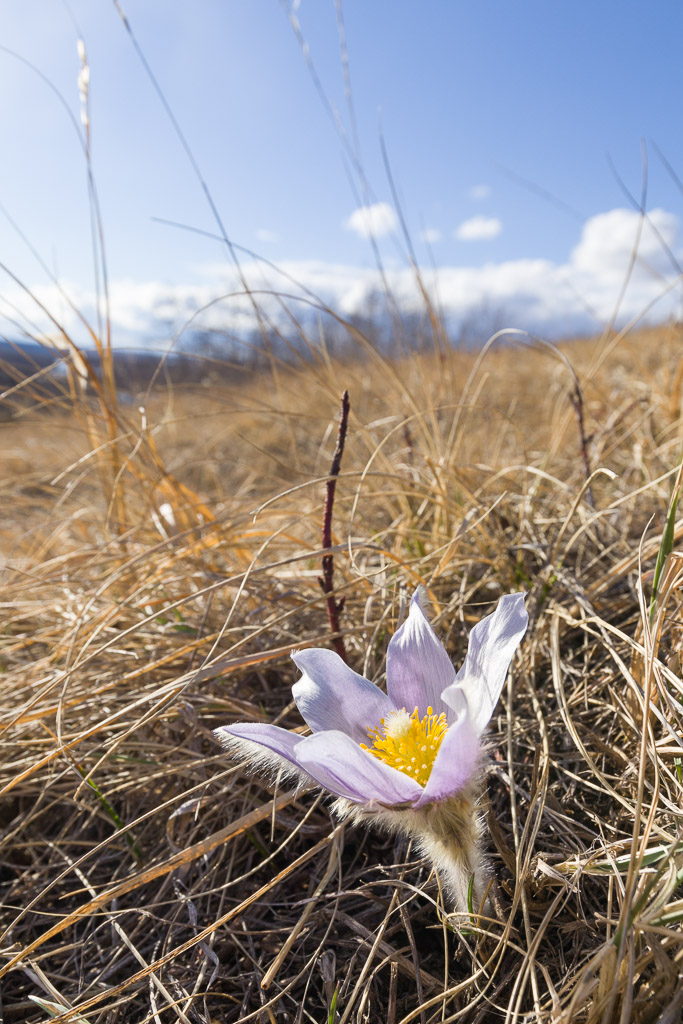
Canon EF 16-35mm f/4L IS USM @ 16mm f/8 1/320sec ISO100
iPhone 6s
The best camera is the one you have with you, is the common saying. The iPhone 6s is a 29mm equivalent fixed f/2.2 camera with a minimum focus distance of about 3.5 inches. As a relatively large aperture lens you might think the iPhone would give decent background blur, but it is also a wide lens so depth of field is always quite large. And, being a fixed aperture, you can’t stop down either to increase depth of field, so your creative potential is limited. You can add close-up lens attachments (I’ve owned Olloclip lenses in the past), but I find these to be cumbersome unless the iPhone is truly the only camera you own.
The other downside of the iPhone is the built-in camera app and the fact that it only saves JPEGs. Low-light performance is also limited. I advocate shooting RAW if you plan to do any post-processing of your photos and (for serious photos) have started using the Lightroom Mobile app camera which saves DNG files, has a very nice looking HDR function, and syncs automatically with Lightroom CC on my desktop computer.
Closest Focusing Distance (m) ~0.12
iPhone 6s LR Mobile @ 29mm f/2.2 1/60sec ISO25
Normal Lenses
Lenses that approximate the angle of view of human vision.
Lensbaby Composer Pro and Edge 50 Optic
I originally owned the Edge 80 optic element for this lens (and still do), but 80mm is a little long for anything other than portraiture for me. I recently ordered the Edge 50 optic and this was really the first opportunity to test out its capabilities. It is not as wide as I am used to, but compresses space nicely, and has a nice effect when combined with the Composer Pro’s tilt functionality (either decreasing or increasing the zone of focus). Both the Edge 80 and Edge 50 have a close-up function (essentially a built-in extension feature), that, in the case of the Edge 50, allows a minimum focusing distance of 8″.
Maximum Magnification (x) 0.28 (on APS-C)
Closest Focusing Distance (m) 0.23
Length (mm) 80
Length to film plane (EF-M) 124mm
Working distance at Maximum Magnification 10.6cm
Lensbaby Composer Pro Edge 50 f/3.2 @ 1/100sec ISO800
Canon EF 100mm f/2.8 Macro USM
I’m including this lens in the normal section, despite the fact that on APS-C it has an equivalent focal length of 160mm, because it is one of the standard macro lens focal lengths available. 50mm and 60mm macro lenses are also common, but I find their minimum working distance too restrictive for dedicated macro use. 100mm creates better subject isolation too.
Lenses that compress space and capture a narrow field of view.
Canon EF-M 55-200mm f/4.5-6.3 IS STM
A good compact APS-C telephoto with excellent reach, the longest EF-M native lens is limited for macro/close-up use by a rather large one metre minimum focusing distance. If I am going out shooting and want to have a tiny telephoto zoom in my bag, just-in-case, I take this lens along. I often have my extension tubes along too, in case I want to shoot some true macros.
This lens, released in 1989, is my oldest surviving Canon EF lens. It is an internal-zoom fixed-aperture L-series lens with excellent glass, but it is slow focusing compared to USM replacements and has a very long minimum focusing distance of 1.8 metres. I haven’t used it for a long time, but have been carrying it around lately. This is a case where having extra sensor resolution is handy so you can crop tighter in post-processing if necessary. With a few extension tubes though I can shorten the MFD to about quarter of a metre and get really nice macros and close-ups. With no full-time manual focus override it is a bit of a pain to switch between manual and auto-focus (the switch is very stiff).
Maximum Magnification (x) 0.13 (on FF)
Closest Focusing Distance (m) 0.31
Length (mm) 185.7mm
Length to film plane (EF-M) 229.7mm
Working distance at Maximum Magnification 157cm
Canon EF 80-200mm f/2.8L @ 150 mm f/4 1/50sec ISO100
Tamron SP 150-600mm F/5-6.3 Di VC USD G2
I bought this lens thinking that I would only be using it to bring distant subjects (e.g., landscapes, wildlife) closer, but have discovered that it is great for magnifying even close-up objects. The minimum focusing distance of 2.2m sounds quite far away, but zoomed to 600mm, and with a working distance of almost 1.9m, I can fill the frame of my EOS M5 with an average sized butterfly, or zoom in on the head of a very skittish garter snake. Never underestimate the value of a large working distance when photographing close-ups of certain subjects.
Maximum Magnification (x) 0.26 (on FF)
Closest Focusing Distance (m) 2.2m
Length (mm) 260.2mm (338.5mm @ 600mm)
Length to film plane (EF-M) 304.2mm
Working distance at Maximum Magnification 189.6cm
Tamron SP AF 150-600mm f/5.0-6.3 Di VC USD G2 @ 226mm f/10 1/80sec ISO100
Summary
You don’t need a dedicated macro lens to create casual or even serious macro photos or close-ups. As noted in some of the above descriptions you can increase magnification in several ways:
extension tubes
accessory close-up lenses/filters
reverse mounting a normal lens
cropping during post-processing
I occasionally use extensions tubes, however, to my recollection, the above photos were all shot without such accessories (prairie crocuses are not that tiny after all).
I believe that macro photographs are like any other type of photograph — technique is not as important as subject matter. Macros of tiny things can be amazing for the view they give us into what seems like another world, but really great macros also tell a story.
I enjoy shooting the occasional macro photo (among the many other types of photography that I enjoy), but some people are really dedicated and fantastic macro shooters. Go look at their work on sites like Flickr and then go out and try some macro photography yourself.
Strictly speaking, I define a macro lens as one that has a reproduction ratio of at least 1:2. That is, a subject can be recorded at 1/2 its original size, or larger, on the camera sensor. Thus, if I label a photograph as a macro photograph, then it has been taken with such a lens or a normal lens fitted with extensions tubes. I use the term close-up for images that were perhaps not taken with a macro-capable lens, but when reproduced on screen or in print at an average size (4″x5″ plus) the subject is larger than life-size. This is usually possible with a lens having a reproduction ratio of only 1:4 (i.e., most lenses).
a sentimental longing or wistful affection for the past, typically for a period or place with happy personal associations.
I consider nostalgia to be bourgeois and dangerous. Bourgeois, because only persons from a fairly well-off social class would long for the past. Dangerous, because this longing for the past can come at the expense of the present, or even the future. Think of the stereotypical 30-year-old pining nostalgically for his glory days as a high school football star. So sad.
To me, the epitome of nostalgia in photography comes in the form of digital photographs that have been post-processed to achieve the look of film photographs. I get the impression that this nostalgia is, ironically, practiced most adamantly by millennials who did not actually live or photograph in the film era. As an ironic device nostalgia fits squarely in the hipster oeuvre.
I do admit, that during a certain period in my revival as a photographer (specifically 2010-2013) I used the iPhone Hipstamatic camera as my snapshot tool of choice. It was not the film-replicating filters that primarily attracted me to Hipstamatic, but instead the simplicity of the interface and the ability to easily put together camera and lens combinations that matched certain moods or experiences. It meant I could shoot a lot, achieve the look I wanted, and not do any post-processing in the little spare time I had. (The iPhone and Hipstamatic were also part of a broader revolution in camera functionality and instant image sharing. Traditional digital cameras weren’t keeping up.)
Seagulls, Sopot, Poland, 2011
The true film look revival came slightly later though, primarily thanks to VSCO Cam. It’s a look I generally abhor, as photographs done in it tend to be monotonous. Thankfully, as the digital film look rose to prominence I moved on to better things and better cameras.
But what is the the film look. There probably is no formal definition, but I include some or all of the following parameters (in the order of decreasing importance):
low contrast, achieved by crushing the blacks, raising the black point, and lowering the white point;
slightly desaturated;
vignetting;
flare;
soft corners.
Essentially the film look is low contrast, low dynamic range, low fidelity.
(Film photographs that have been digitize are often presented with similar qualities, but actual film photography is a different genre entirely, and I confine my discussion here to images originally captured with a modern digital camera. I have a tumblr blog of old film scans: vintage-slides.tumblr.com)
Film scan, 1995
Notwithstanding my general dislike for the overuse of the simulacrum film look, there are times when this post-processing technique can be useful. I prefer these under-cooked images to ones with grossly over-cooked post-processing, and for scenes with wide dynamic range, the film look is one way to tame contrast in a relatively pleasing way.
I shoot in RAW format, and usually maximize dynamic range, contrast, and saturation as much as possible. That is, I don’t over do my post-processing, but I don’t under do it either. I try to squeeze as much information as I can out of modern imaging devices: cameras, lenses, monitors, and printers.
Occasionally though, I think some images could be well served rendered with the film look, either because of lighting conditions or the choice of subject matter. I too am not immune to nostalgia it seems.
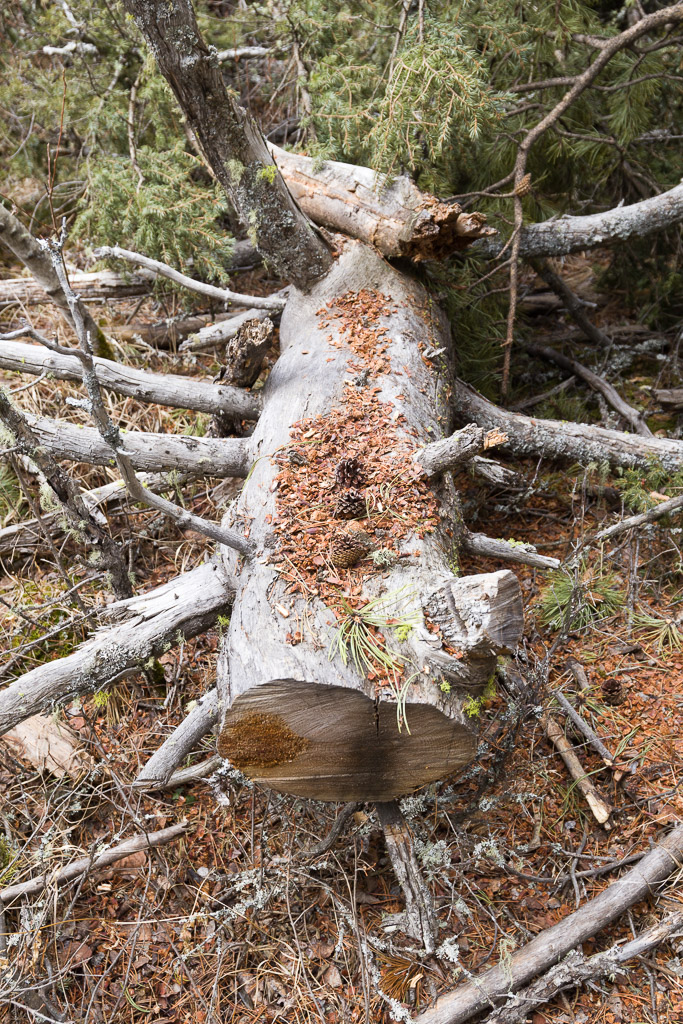
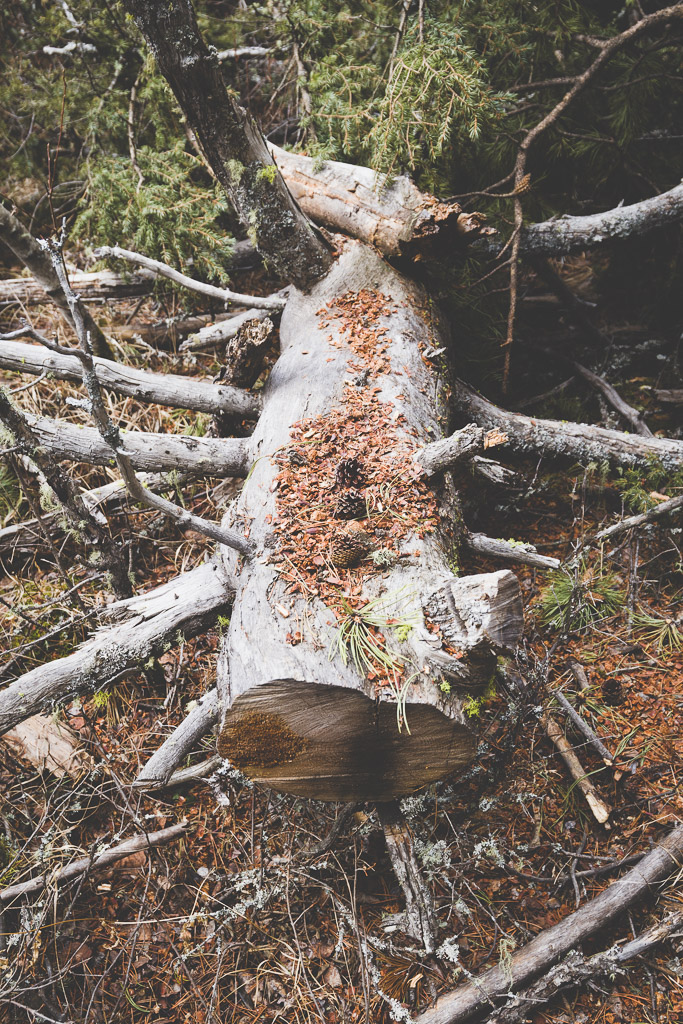
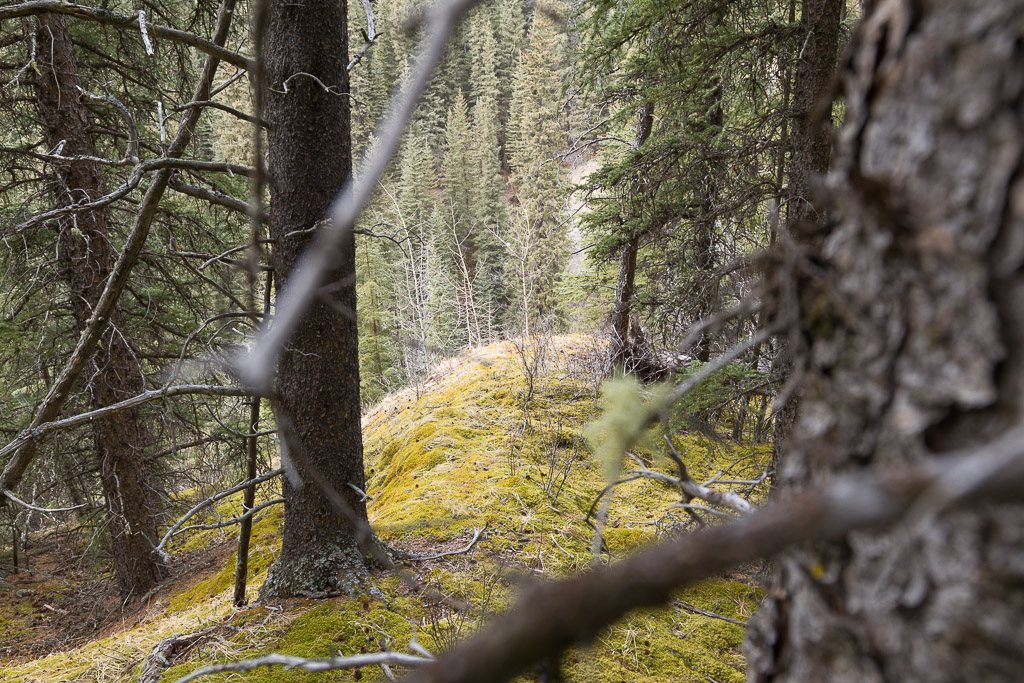
Recently, after spending a day working on our family cabin, I stole a few moments to escape the plumbing and to go for a much deserved walk around the property. Armed with the latest in digital photography apparatuses (a Canon EOS M5 and Canon EF 16-35mm f/4 L IS USM) I immediately decided that the resultant images would be processed with the film look. (I’d recently been inspired by the work of Flickr member Dahlia Ambrose). Moving fast and working quickly, in 45 minutes and over 1.5 kilometres I captured about 70 photographs — a much higher pace than would have been realistic when I really was shooting with film.
Several days later, I sat down at the computer and paired the selection down to about 30 images. Below are some of the post-processing steps I take to achieve the film look in Lightroom. (Some images are given a black and white treatment which I call noir after one of my favourite filters in Snapseed, but otherwise the black and white processing is very similar to that of the colour images).
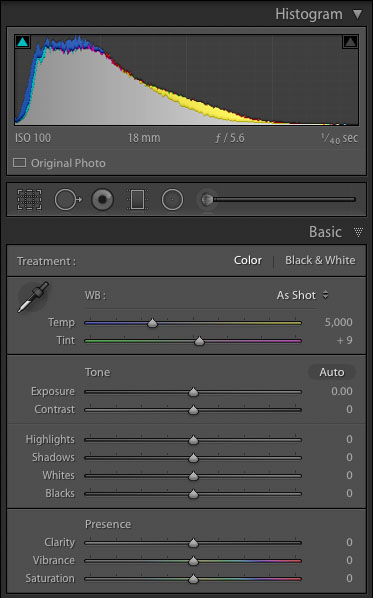
Basic Adjustments
I start by doing my usual post-processing steps to arrive at a true-to-life representation of the original scene. These workflow steps are common to every single keeper RAW photograph I take regardless of the final intended use or treatment.
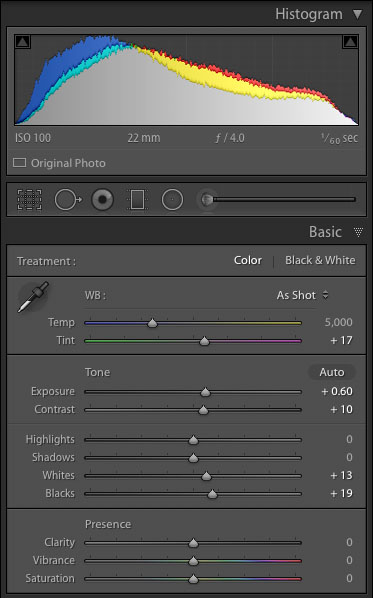
Apply custom camera calibration (created for each specific camera and lighting situation using a ColorChecker Passport target)
Set white and black point (eliminate clipping and maximize dynamic range)
Adjust scene brightness and contrast (I shoot using the “expose to the right” methodology, though this example image was slightly underexposed to guarantee I did not blow out any of the shiny grey log).
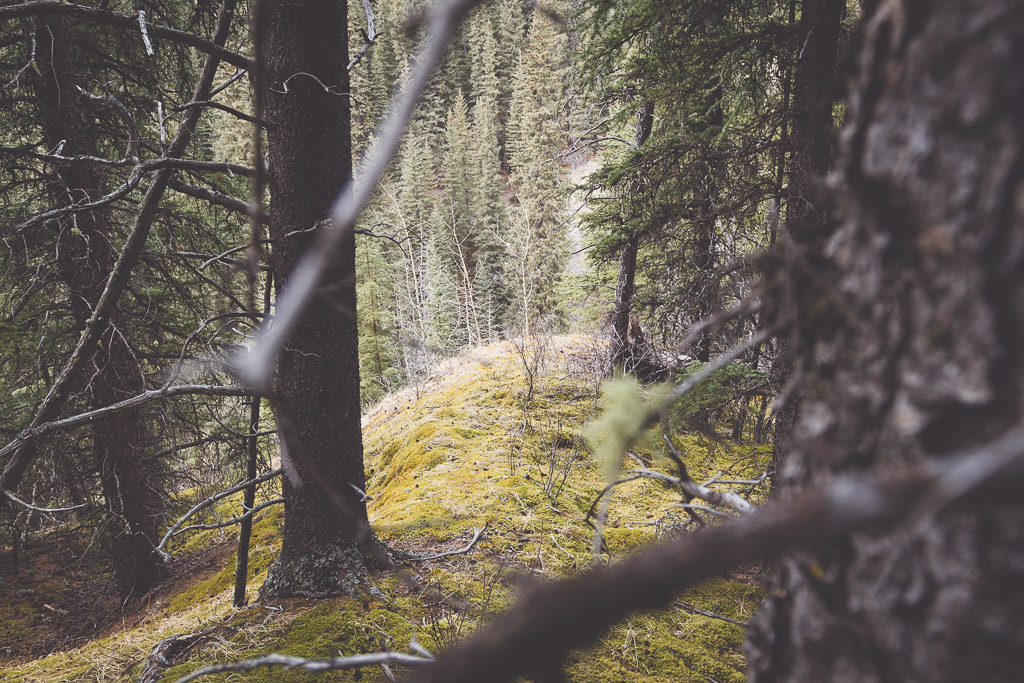
Apply Custom Film Preset
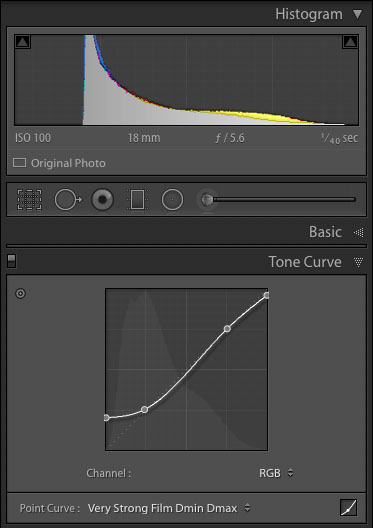
I have a predefined set of custom film presets that contain the following:
Tone curve to modify black and white points, and crush the blacks
Vignetting (I have standardized on four levels of vignetting across all my post processing, in descending order of frequency of use: 0 none, -8 mild, -18 strong, -28 very strong)
Desaturate (-10)
When I applying moderate vignetting I usually also increase the overall image brightness (either via the exposure slider for ad hoc work or the tone curve for presets) to maintain the same average scene brightness. That is, as I darken the image corners I also lighten the image centre to compensate.
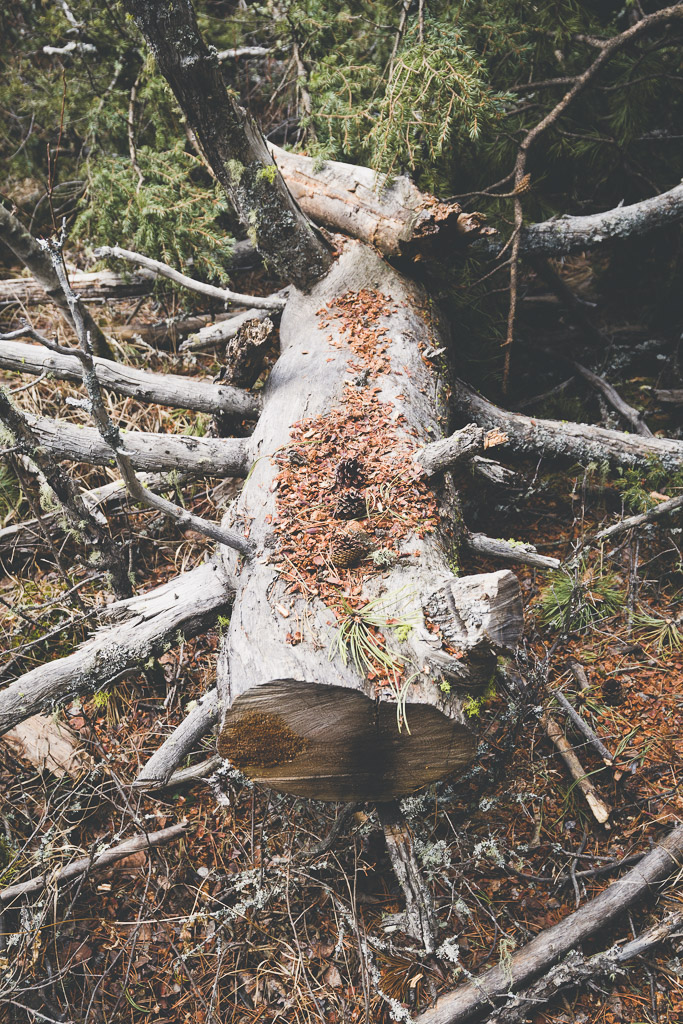
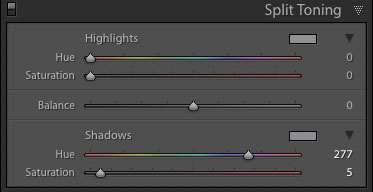
Add Split Toning
Some images are done after applying the film preset, others benefit from mild split toning (that is, adding a colour cast to the blacks, the highlights, or both).
Rather than trying to emulate a specific film stock I use basic colour theory to determine the split tone colours. For example, if the dominate subject is bright green (e.g., foliage), I will add a slight purple or magenta cast to the shadows. This helps accentuate the main subject. There are no hard rules about this though and I do the split toning on an image by image basis.
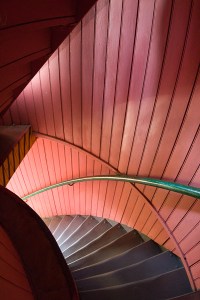
The Floating World Series of photographs was born out of an experiment with my Canon EF 8-15mm f/4 L USM fisheye zoom lens.
An early succesful shot with the Canon EF 8-15mm f/4 L USM Fisheye.
I bought this unique lens a few years ago, but have struggled with creating images with it. It is not the fisheye distortion that causes me problems, but the seriously wide angle of view which makes it difficult to simplify the scene (so much is included) and the fact that a light source is almost always captured in the frame leading to dynamic range issues.
I wanted to give this lens another try and planned to take it downtown to play with some architectural shots.
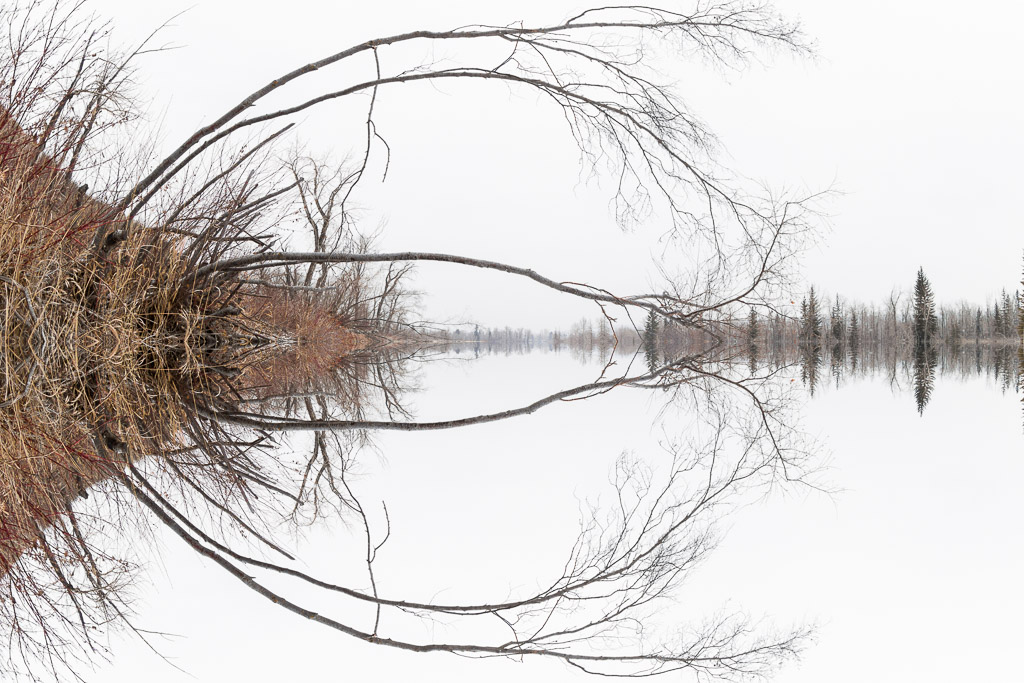
While planning my shoot I saw an architecture photo on Flickr by Peter Stewart which showed enigmatic symmetrically. This photo gave me the idea of intentionally mirroring half of the fisheye frame to create symmetrical images. I would then only have to worry about the content and dynamic range of half the image. I thought this technique might work to add some abstraction to the architectural shots I was planning. I’ve seen shots like this before (usually duplicating one quadrant into what people describe as a kaleidoscope image), and the results can be trite, but I thought I could do something new and creative with this technique.
Unfortunately early March weather took a turn for the worse and I knew we were going to be in for a few cold grey days. I couldn’t get downtown right away, so I decided to go shoot some tests in the natural park near my house.
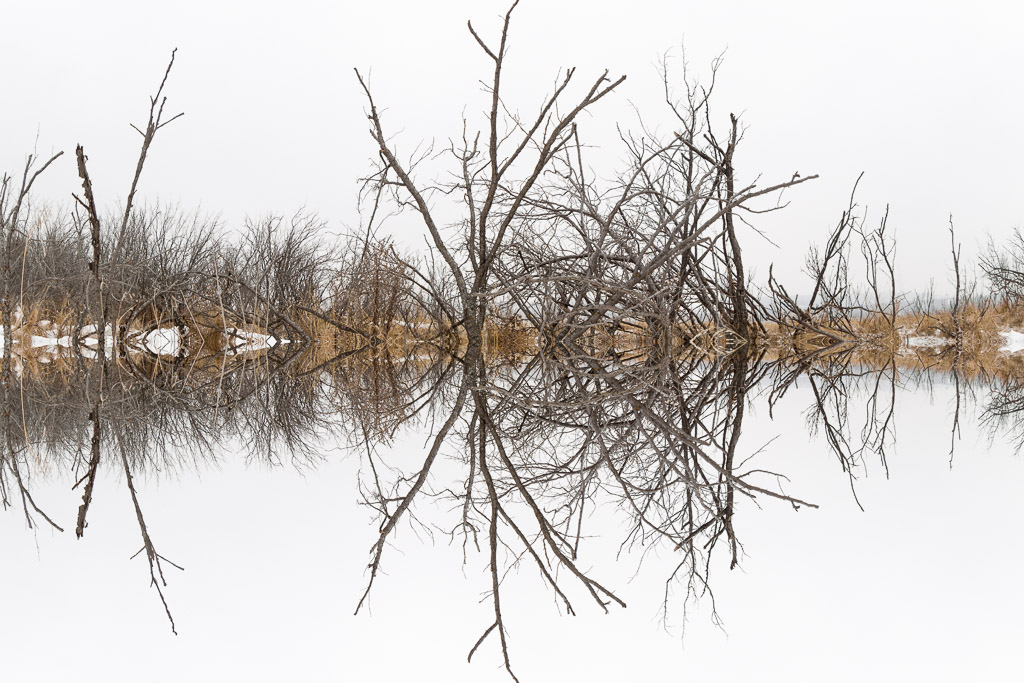
With the grey overcast sky and flat light I figured I would be capturing a lot of sky at the top of the frame and some stark winter branches and trees nearer the middle. With a fisheye lens, straight lines that run through the middle of the frame remain straight, but lines progressively closer to the edges of the frame appear more and more curved. Since I was going to be mirroring the frame down the middle I figured I would be placing the horizon near the middle of frame. I would thus have a distant line through the middle of the frame, some closer stronger lines branching perpendicular to this central line, and the white negative space of the sky surrounding the majority of the subject. This is what I pre-visualized as I set out to take the first experimental shots.
Floating World 2017-03-05 1
When shooting these fisheye photos it is hard to imagine the complete composition while looking through the viewfinder. I keep an eye on the content of the top half of the frame and watch the line of subject matter at the centre of the frame where the mirroring will take place.
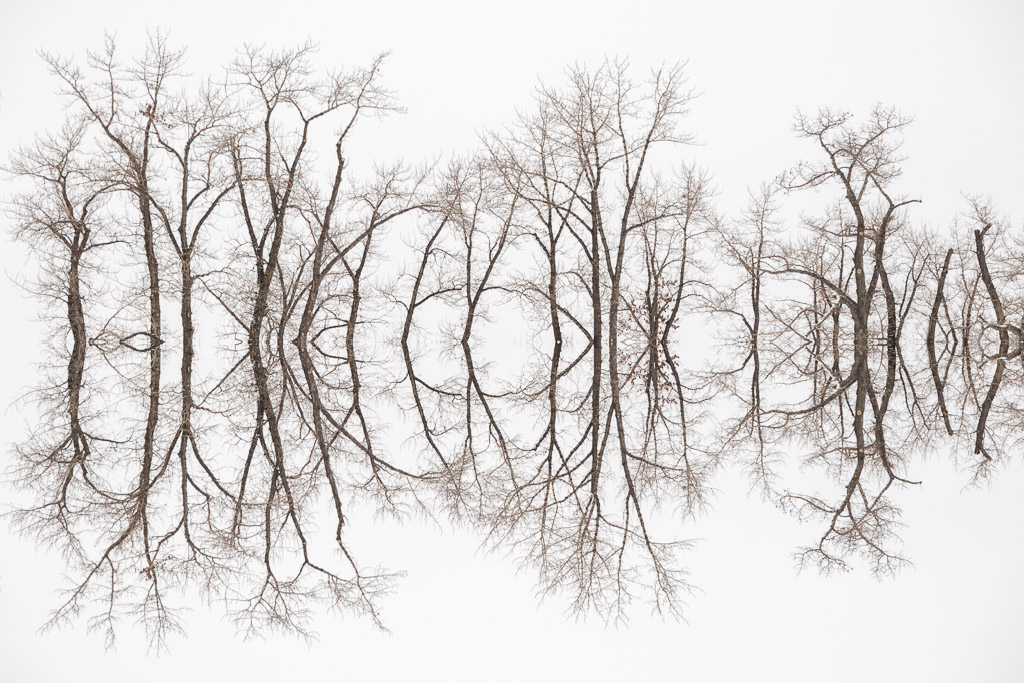
Back at home on the computer I load the raw frames into Lightroom. I do some basic adjustments to deal with scene brightness and dynamic range, all the while focusing on only the top half of the frame. Then I open the best images in Photoshop, selected half of each frame, and flip it across the central axis. Back in Lightroom I do some very minor adjustments to the black and white clipping.
Floating World 2017-03-08 10
I thought at first I would be rotating horizontal shots into portrait orientation so the image was symmetrical left to right, but I often find that to be too static and artificial. Images seem more dynamic when the mirroring occurs across the horizontal axis and they remain asymmetrical left to right. Our brains seem hard wired to expect some asymmetry to occur left to right, even with faces which are never completely symmetrical, but accept a mirrored scene from top to bottom, probably because we often see things reflected in water that way.
Really, post-processing is quite straightforward.
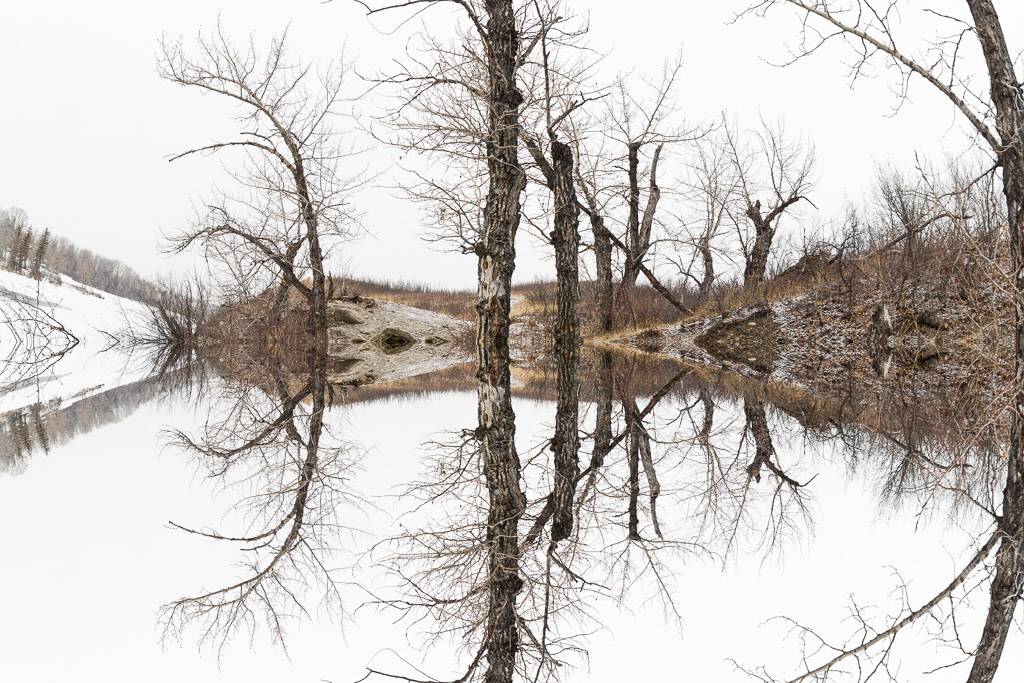
Floating World 2017-03-05 2
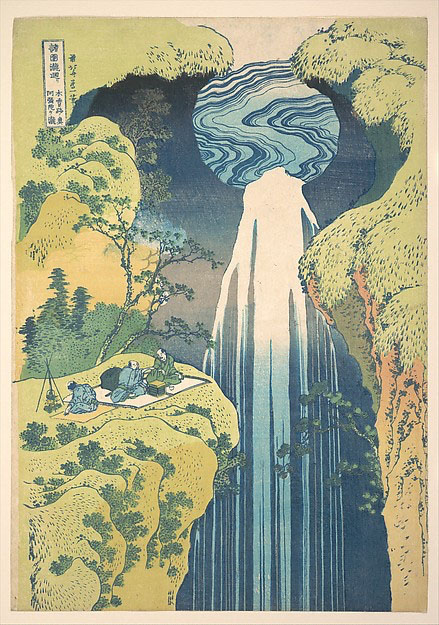
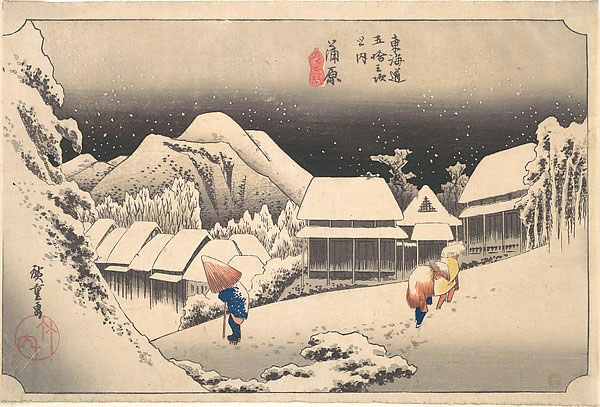
The Floating World Series title is a reference to the Japanese “floating world” school of drawing and painting (ukiyo-e) popular during the Edo and Meiji periods.
Katsushika Hokusai, The Amida Falls in the Far Reaches of the Kisokaidō Road, ca. 1832
Like the Japanese works, the photographs encompass both straightforward descriptive representations of the world, and graphically abstract qualities. Also, because, in most of these photographs, the sky forms a border around the edge of the entire image, the central subject is left floating in a field of negative space (much like many of the Japanese images).
Utagawa Hiroshige, A Snowy Evening at Kambara Station, ca. 1833–34
In my photographs the mirroring heightens the tension between the abstract and pictorial qualities. There is no attempt to hide the original subject, but a new and more abstract subject appears in the final composition.
Floating World 2017-03-08 4
Writing about his Horizon series of repurposed found photographs, Martin Venezky, states the following:
For me, the photographic relationship between the pictorial and the abstract is one of the most fundamental understandings of place and time. “Place” is something we carry with us—a summation of our inner memories mapped onto the present landscape as we traverse it. The continuity of the land, though, has its own unbroken timeframe, and it is much longer and steadier than the interrupted, distracted time we are able to spend with it. While we look for the universal, we are always tripped up by our own presence.1
This statement mirrors my views of both architectural and landscape photography. While I do not attempt to hide the identity of a location I also expect each photograph to stand on its own independent of the original location. Its the difference between taking a photograph of a location versus at a location. Viewers expecting to see some recognizable place in the Floating World photographs will perhaps be disappointed. The photographs are merely interpretations, signs and not the signified, double abstractions of the scenes they represent due to both the basic nature of photography and mirroring process.
I photograph almost exclusively with a raw workflow and edit in Lightroom. I just can’t get used to Canon’s clunky Digital Photo Professional even for mundane tasks.
The downside of all this is that when Canon releases new lenses it may take a few months for Adobe to add new lens correction data, particularly for the less popular EF-M lenses. Apparently it took Adobe almost a full year to add support for the Canon RF 50mm ƒ/1.8 IS STM.
Thus, I have gone through the rather arduous process of creating a few custom lens profiles using Adobe Lens Profile Creator. When I am completely satisfied with a profile I will share it with Adobe so it can be downloaded via the Lens Profile Downloader, but I will also post interim and final profiles here.
Update 2023-02-17: Adobe discontinued the community-based Lens Profile Downloader application on 2018-01-01. Also, the Adobe Lens Profile Creator application does not work in Mac OS 10.15 (Catalina) or later. The last supported operating system is Mac OS 10.14 (Mojave). I am not sure about current Windows support.
Custom Lens Profiles are supported in Adobe Camera Raw and Adobe Lightroom (but not on mobile—see note below).
To install a custom lens profile, download the appropriate .ZIP file, decompress, and copy the .LCP file to either of the following locations.
Mac OS:
Macintosh HD > Users > [your username] > Library > Application Support > Adobe > CameraRaw > LensProfiles > 1.0
Update 2023-02-17: Lens profiles added to the above locations should work in desktop versions of Lightroom, Lightroom Classic, Camera Raw, Bridge, and Photoshop. As yet, there is not way to sync or install custom lens profile in Adobe’s mobile apps. So, although you can use a custom profile in Lightroom, you cannot sync that profile to Lightroom Mobile and the mobile app will render photos with no profile or a built-in profile.
Custom Lens Profiles
Uncorrected
Custom
LR Built-in
DPP Built-in
Canon EF-M 55-200mm f4.5-6.3 IS STM (2016-02-01) Download
Canon EF-M 18-150mm f3.5-6.3 IS STM (2017-01-29) Download
At the time of writing, Lightroom and ACR do not have a built-in lens correction profile for this lens. Manual correction for distortion and vignetting is shown.
Neither DPP nor the EOS Lens Registration Tool have correction data for this lens. The in-camera Lens Correction menu shows “No Data” for all correction parameters.
My wife wants to visit Croatia. She likes to travel and see new places. I too like to experience new things, but I am just as happy to stay and explore near home.
To be fair, my wife is European and I know, living in Canada, she misses the cultural vibrance and diversity across the pond.
My wife has mentioned Croatia several times. The sea, the food, the wine, the people — it all seems very romantic.
Recently when she mentioned going to Croatia for a holiday my response was this: “Croatia is just a place.” No better or worse than any other place, just maybe different. Calgary, Alberta, where we live, is also a place.
My wife scowled.
“I’m sure, in Croatia,” I continued, “there is someone dreaming of one day visiting our Canadian Rockies.”
—
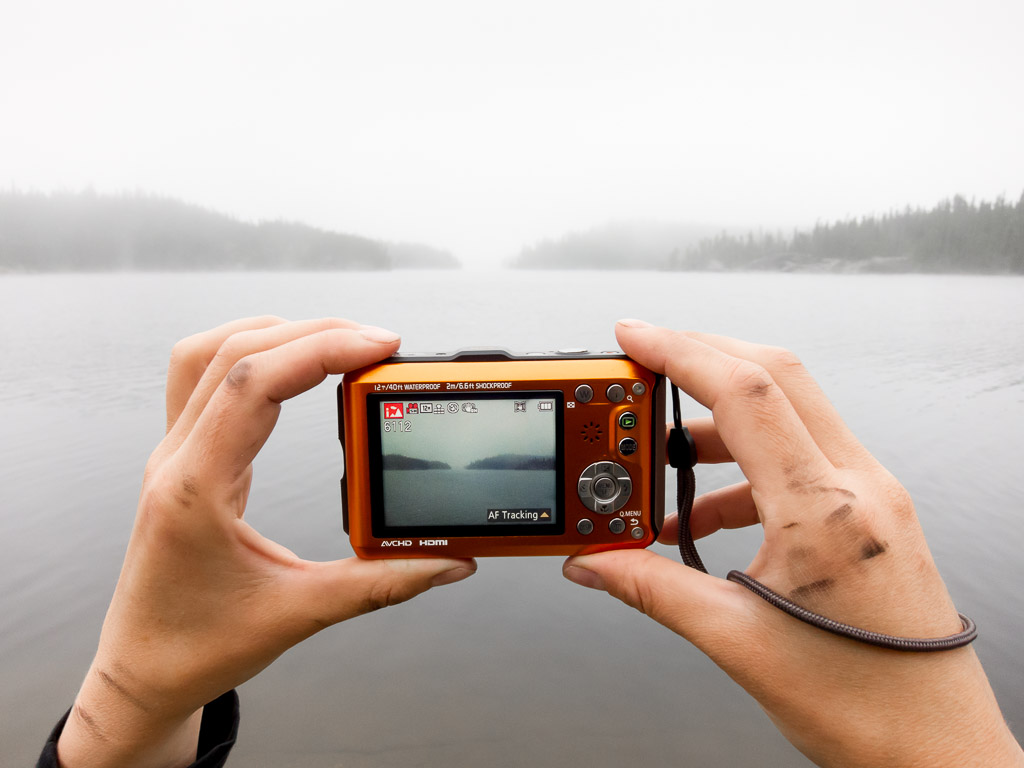
Photographing The Fog
To me, photography (and art in general) is about exploring ideas and presenting a vision of the world. An artist who creates art in rural Saskatchewan, let us say, is no less an artist than the one who makes it big by moving to New York City. One may have a bigger audience than the other and the potential to make more money, but that is not a direct reflection on the art.
I take photographs when I travel. Every photographer does. It’s nice to see new things and get a new perspective. Travel can be inspiring. However, I do the majority of my photographic work, the stuff that really pushes my boundaries (figuratively speaking), in my own backyard (figuratively speaking). The difference is this: I will never truly know my subject in a foreign place, but at home I know it very well.
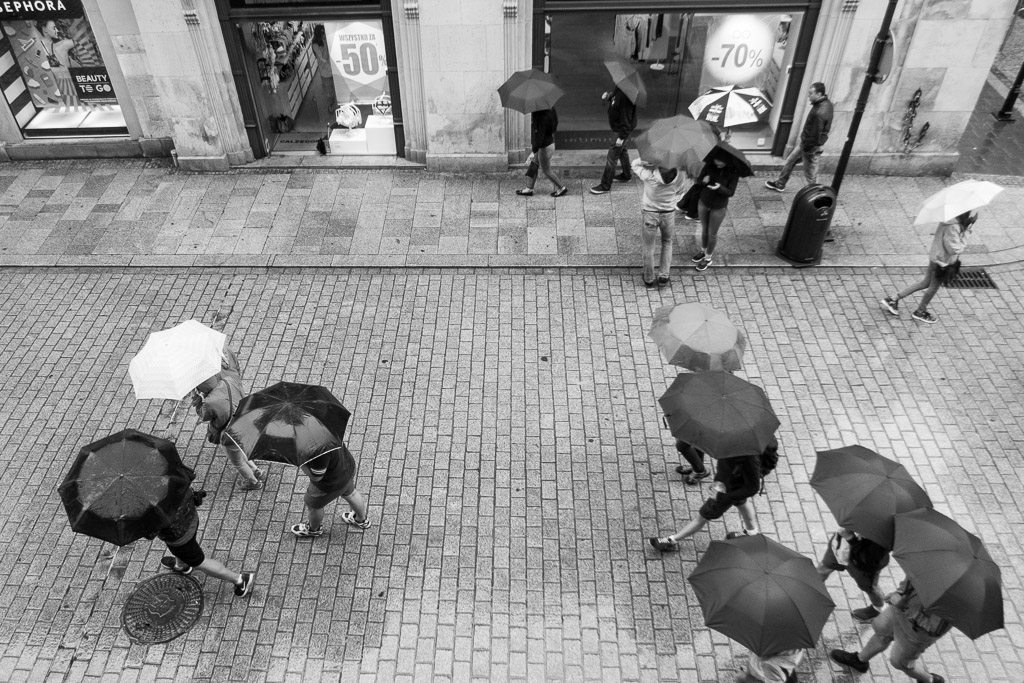
Umbrellas, Ulica Florianska, Krakow, Poland
Many photographers feel they have to travel to take photographs. They don’t photograph where they live, or if they do they think those photographs are somehow inferior (because they think their home is inferior?) A photographer from Ohio might think that their local cities are not as vibrant as Paris, France, or that their landscape is not as spectacular as Patagonia. (For the record, I have never been to Ohio, Paris, or Patagonia.)
I’d rather see someone’s unique take on a locale they know and love than to see them try to recreate some preconceived image of a famous foreign place. (I’ve recently been fascinated by photographic Tumblr blogs featuring images taken in Siberian Soviet-era cities.)
When shooting locally, I avoid shooting the typical scenes that have been recorded thousands of times before. I’ve never photographed Mount Rundle from Vermillion Lakes, and Moraine Lake was on our $20 bill for many years so I don’t think I could improve upon that. Instead, I try to see unique things around me and capture those. I’d rather photograph the hordes of tourists in Johnston Canyon than try to photograph the canyon falls.
—
In western Canada one thing that we have a lot of and are proud of is geology. From sculpted prairies to the rolling foothills and the towering Rockies, locals and visitors alike are very aware of the local geology. In school we learn about glaciers, rivers, and continental drift—all things that have shaped our land.
Whenever we are in Poland (my wife’s homeland) I inevitably ask my wife some question about the geological history of some place. Sadly (for her and I) she says that she never really learned much about the geology of Poland in school. Anything that was taught about the history of the land was always in the context of the people who lived there or the people that invaded. In Europe, in general, history means the history of people. In southern-western Alberta where we live, the natural history of the place is as important as more recent events concerning local people and invaders.
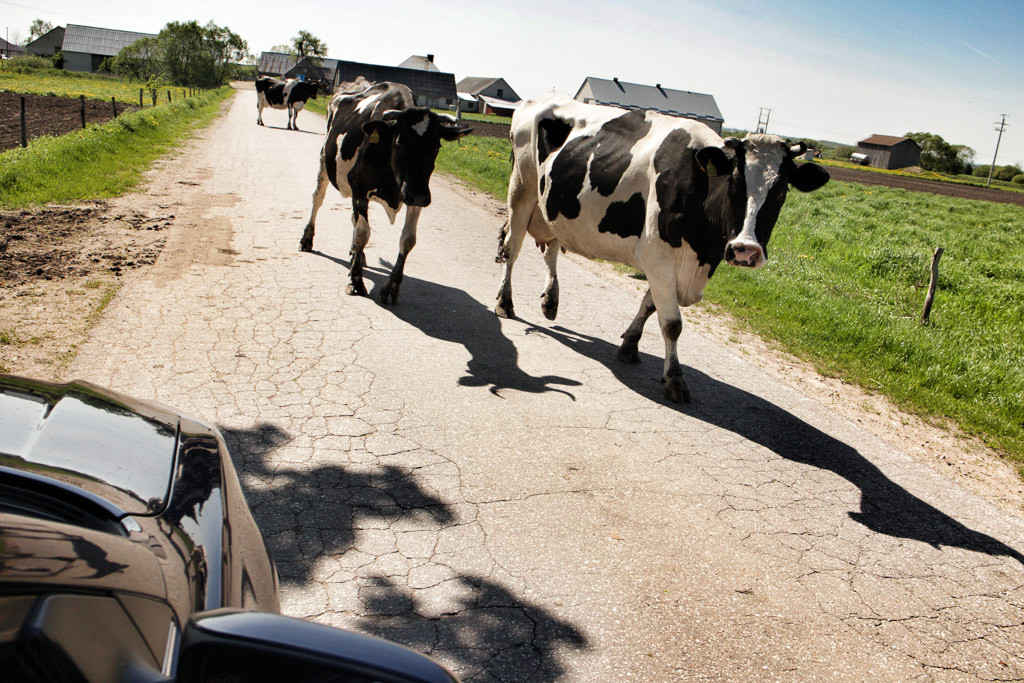
Polish Cows
In 2013 my wife and I spent a few days kayaking on the Biebrza and Narew rivers in northeastern Poland. Our guide was Marek, a local kayak outfitter and old friend of my wife’s. Marek is also a photographer and has spent a lifetime documenting the many facets, moods, and seasons of the natural areas and wildlife of the land around his home. His depth of knowledge about the local ecosystem and history is perhaps unrivalled. This knowledge informs his photography of this unique and beautiful place.
But, if you asked the average photographer about the locations on their bucket-list, it is unlikely that the wilderness of northeastern Poland would be on that list. (By the way, I don’t have a bucket-list, but I would love to go back to photograph that area again.)
—
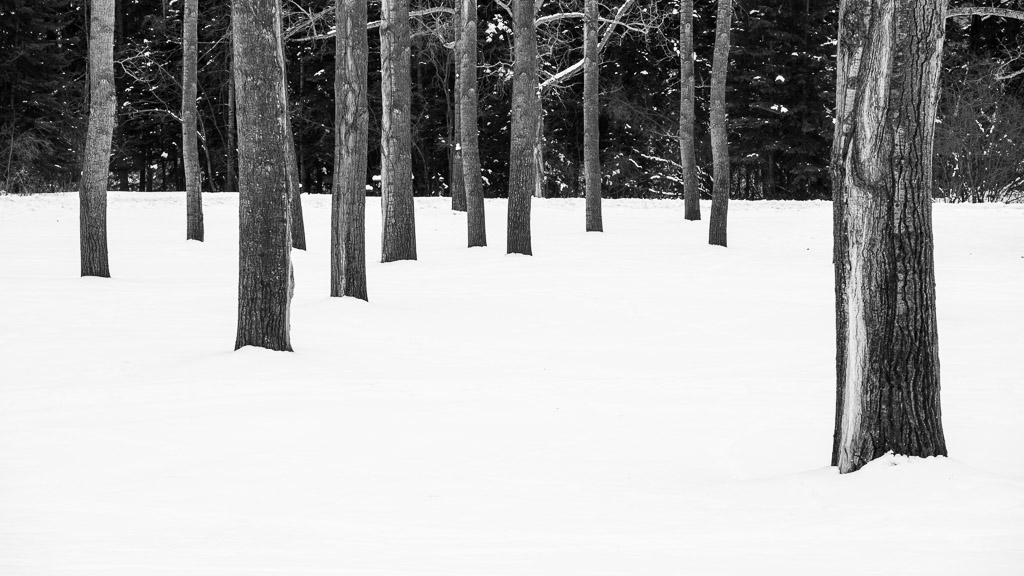
Bowness Park Poplars In Snow
Globally, masses of photographers create masses of photographs everyday. Many of these photos are of famous locations (e.g., the Grand Canyon) or tourist attractions (e.g., Eiffel Tower). The likelihood that you or I can go to one of these places and create an image unlike any other is improbable.
That is why I advocate that photographers focus their efforts on photographing closer to home. Each of us has a unique vision and an intimate understanding of the place where we live.
A National Geographic article from the late 1990s or early 2000s really solidified this idea for me (I can’t recall the date of the issue or the name of the photographer in question at the moment). While National Geographic photographers are renowned for their professional ability to travel the globe and bring home stories about distant and complex places, this one photo essay, by a photographer shooting landscapes near his home somewhere in the mid-western USA, showed a level of intimacy I had never seen before in the magazine. The images were also not like anything I had ever seen from any other location. I believe the photographer’s understanding of his home landscape infused the photographs with light and life.
—
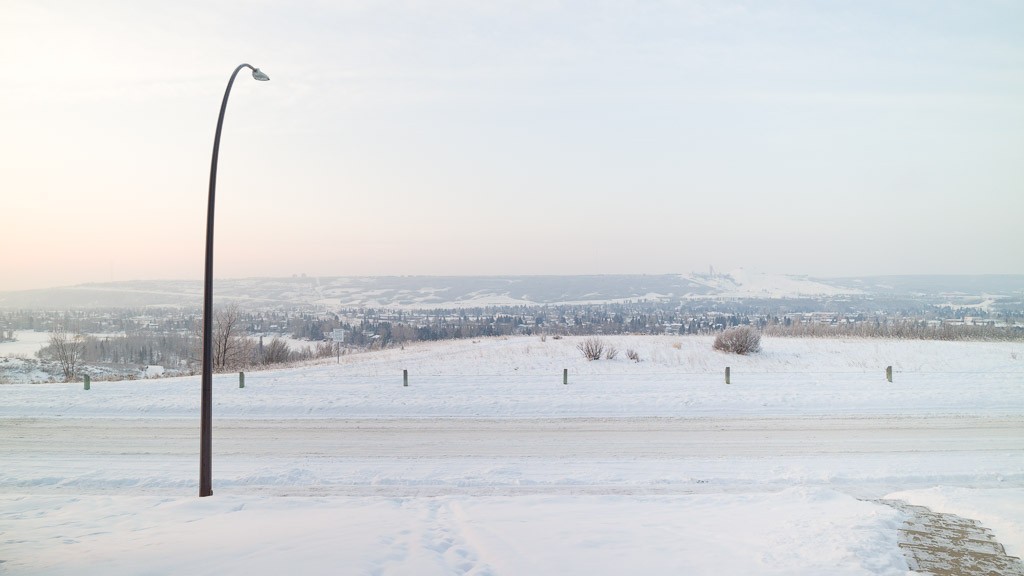
Silverview 2017-01-07 08:54
I have an ongoing project photographing very literally the landscape where I live. As a stay at home dad, and unable to get away from the house regularly, I started photographing the view out my front window. While the subject seems mundane (a suburban street and green-space), the project has helped me better understand the light and moods of where I live. The more I shoot the more skills I have for reading the light, skills I can take with me when I shoot farther afield — by the local river, in the mountains, or on the other side of the globe.